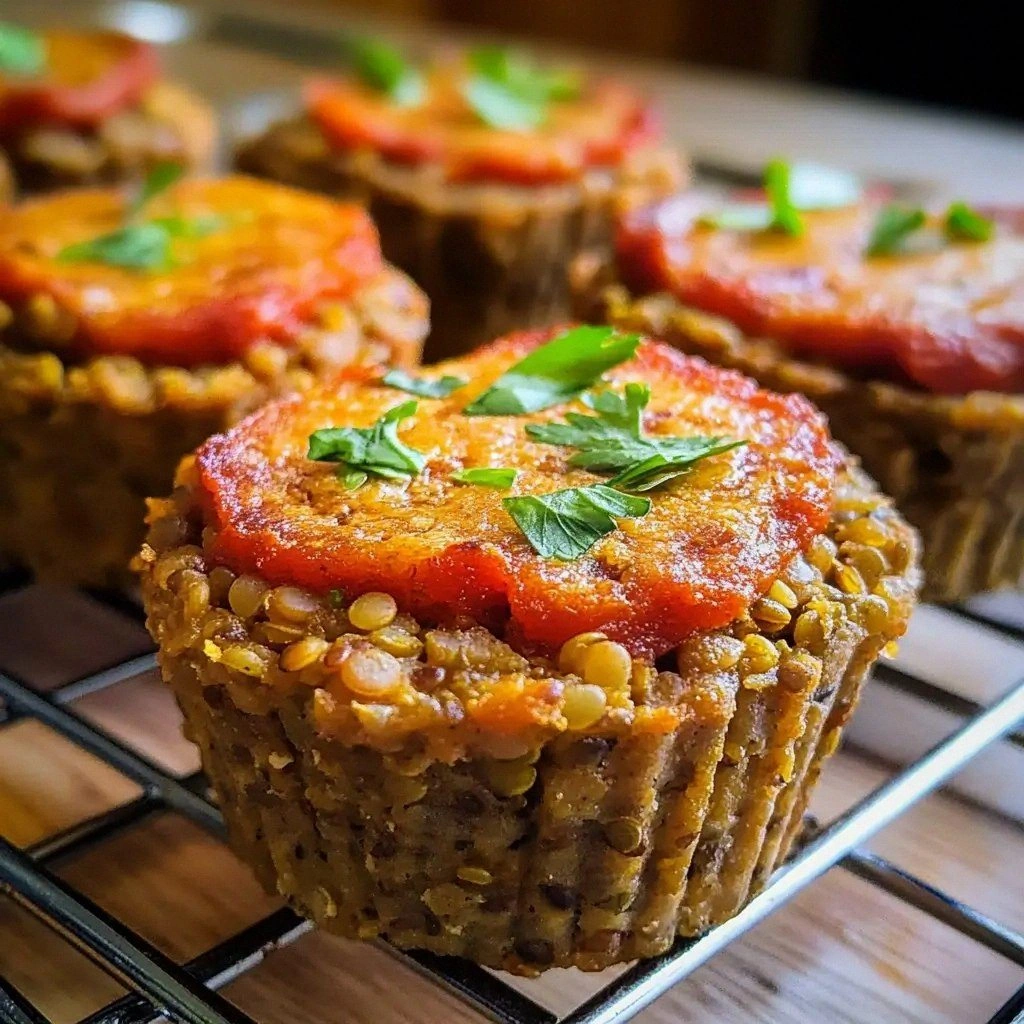
I remember the night I almost turned my kitchen into a culinary disaster zone. A bag of dry lentils, a handful of breadcrumbs, and a stubborn sense of hunger had me scrambling for a solution that could save my dinner plans. I was halfway through a bland, soggy batch of lentil meatloaf when I realized I was missing the magic that turns a simple recipe into a flavor explosion. That moment of panic sparked a daring experiment that would become the ultimate vegan lentil meatloaf cups.
Picture the scene: the oven preheated to a comforting 375°F, the scent of toasted breadcrumbs mingling with the earthy aroma of lentils, and the rhythmic click of a wooden spoon against a mixing bowl. The kitchen hummed with anticipation, the walls echoing faint sizzles as carrots and onions diced into perfect cubes. My senses were fully engaged: the crunch of fresh veggies, the subtle sweetness of maple syrup, the smoky whisper of paprika, and the faint tang of soy sauce. Every element was a note in a symphony that promised a bite-sized masterpiece.
What sets this version apart from the countless other meatloaf recipes is the sheer balance of texture and flavor, achieved through a clever use of binders, spices, and a touch of sweetness. The cups hold their shape like miniature loaves, yet each bite offers a juicy, moist interior that melts in your mouth. The sauce coats the mixture like velvet, while the crunchy edges crackle like thin ice when you bite. This isn’t just a recipe; it’s a culinary revelation that turns a humble lentil into a crowd‑pleasing star.
And there’s a twist that you won’t expect: a splash of maple syrup and a dash of ground flaxseed to create a sweet‑savory glaze and a binder that’s both plant‑based and protein‑rich. I dare you to taste this and not go back for seconds. Picture yourself pulling these cups out of the oven, the kitchen smelling incredible, and serving them to friends who will be amazed at the depth of flavor. Let me walk you through every single step — by the end, you’ll wonder how you ever made it any other way.
What Makes This Version Stand Out
- Taste: The blend of tomato, smoked paprika, and maple syrup creates a complex, umami-rich profile that rivals any traditional meatloaf.
- Texture: The combination of lentils, breadcrumbs, and flaxseed binder delivers a moist interior with a satisfying bite on the edges.
- Simplicity: With just 16 ingredients, this recipe is straightforward enough for beginners yet sophisticated enough for seasoned cooks.
- Uniqueness: Serving the loaf in cup form transforms it into a portable, portion‑controlled meal perfect for lunches or dinner parties.
- Crowd Reaction: Friends who thought they were stuck with bland vegan dishes rave about the savory depth and comforting feel of each cup.
- Ingredient Quality: Fresh, whole‑food components ensure each bite is nutrient‑dense and free from artificial additives.
- Cooking Method: Baking at a moderate temperature preserves moisture and allows the flavors to meld without over‑drying.
- Make‑Ahead Potential: These cups can be assembled ahead of time and frozen, making them an excellent option for busy weeknights.
Alright, let's break down exactly what goes into this masterpiece…
Inside the Ingredient List
The Flavor Base
At the heart of these cups is a rich tomato sauce that anchors the entire flavor profile. The acidity from the tomato balances the earthiness of lentils, while the sweet hint from maple syrup provides a subtle caramelization during baking. Skipping the sauce would leave the mixture bland and dry; every spoonful would lack that satisfying depth that makes a loaf memorable.
The Texture Crew
Breadcrumbs and ground flaxseed are the unsung heroes that bind the mixture together. Breadcrumbs absorb moisture, giving the cups structure, while flaxseed, when mixed with water, creates a gelatinous binder that keeps everything from falling apart. If you’re gluten‑free, simply replace breadcrumbs with almond meal or oat flour; the result will still hold together beautifully.
The Unexpected Star
Maple syrup is the secret to that glossy, caramelized glaze that makes each cup irresistible. It adds a touch of sweetness that contrasts perfectly with the smoky paprika and savory soy sauce. If you prefer a sweeter profile, swap maple syrup for agave nectar or a splash of vanilla‑infused coconut milk.
The Final Flourish
Fresh parsley and a pinch of black pepper finish the dish with a burst of color and a peppery kick. Parsley’s bright green hue adds visual appeal, while the pepper gives a subtle heat that awakens the palate. Without these finishing touches, the cups would feel flat and unremarkable.
Everything's prepped? Good. Let's get into the real action…
The Method — Step by Step
- Preheat the oven to 375°F (190°C) and line a muffin tin with parchment cups or silicone molds. This preparation step ensures each cup holds its shape and prevents sticking.
- In a large mixing bowl, combine the cooked lentils, breadcrumbs, diced carrots, diced onions, and minced garlic. Stir until the mixture resembles a thick, moist batter. The aroma of the fresh veggies will start to dance, signaling that you’re on the right track.
- Add the tomato sauce, soy sauce, nutritional yeast, smoked paprika, dried oregano, salt, black pepper, parsley, olive oil, maple syrup, ground flaxseed, and water. Mix everything together until the batter is evenly distributed. The mixture should hold together but still be loose enough to scoop into cups. Kitchen Hack: Use a silicone spatula to press the mixture into the cups, ensuring the edges are compacted for a clean finish.
- Spoon the mixture into the prepared cups, filling each about 3/4 full. Press down gently to shape the loaf and help the binder set. The cups should feel firm yet pliable.
- Bake for 25–30 minutes, until the tops are golden brown and the cups hold their shape. The scent of toasted breadcrumbs will fill the kitchen, creating an irresistible aroma that will have everyone coming to the counter.
- Remove from the oven and let cool for 5 minutes before serving. The cups will still be hot, so handle with care to avoid burns. This short rest allows the flavors to settle and the edges to crisp slightly.
- Optional: Drizzle a simple glaze of maple syrup and soy sauce over the tops for an extra layer of umami. This glaze adds a glossy sheen and a sweet‑savory finish that enhances the overall experience.
- Serve immediately with a side of fresh salad or steamed vegetables. The cups are bite‑size, making them perfect for a quick lunch, a dinner party, or a family gathering.
That's it — you did it. But hold on, I've got a few more tricks that'll take this to another level…
Insider Tricks for Flawless Results
The Temperature Rule Nobody Follows
Baking at the right temperature is crucial. Too high, and the cups will burn on the outside while remaining raw inside. Too low, and they will spread and lose their shape. Aim for 375°F (190°C) and keep a heat‑resistant thermometer handy to check the internal temperature if you’re uncertain. This simple tweak guarantees a perfectly cooked loaf every time.
Why Your Nose Knows Best
Trust your nose during baking. When the aroma shifts from raw lentils to a toasted, caramelized scent, you’re almost there. That subtle shift signals that the sugars are caramelizing and the flavors are melding. If you’re unsure, take a quick sniff; it’s a reliable indicator of doneness.
The 5-Minute Rest That Changes Everything
After baking, let the cups rest for exactly five minutes. This pause allows the steam to redistribute, keeping the interior moist while the crust crispens. Skipping this step will leave the cups feeling dry and unbalanced. The rest period is a small investment for a big payoff in texture.
The Secret Ingredient Swap
If you’re craving a smoky flavor, substitute regular soy sauce with smoked soy sauce or add a teaspoon of liquid smoke. This swap intensifies the depth of flavor without adding extra calories. It’s a simple tweak that elevates the dish from good to unforgettable.
The Quick Glaze Trick
A quick glaze of maple syrup and soy sauce not only adds shine but also balances the savory notes with a touch of sweetness. Drizzle it over the cups right before serving. The glaze sets in a matter of seconds, creating a glossy finish that’s as pleasing to the eye as it is to the palate.
Creative Twists and Variations
This recipe is a playground. Here are some of my favorite ways to switch things up:
Mediterranean Twist
Swap the carrots for diced zucchini and add chopped kalamata olives, sun‑dried tomatoes, and a pinch of oregano. The result is a savory loaf with a briny Mediterranean flair that pairs beautifully with a cucumber‑yogurt dip.
Spicy Cajun Variation
Add a tablespoon of Cajun seasoning, a dash of cayenne pepper, and replace the parsley with chopped cilantro. These spices give the cups a bold, fiery kick that’s perfect for a summer cookout.
Cheesy Cauliflower Version
Replace the breadcrumbs with cauliflower rice and sprinkle vegan cheese on top before baking. The cheese melts into a gooey topping, turning the cups into a comfort‑food classic.
Herb‑Infused Variation
Add fresh rosemary, thyme, and sage to the mixture for a fragrant, herbaceous flavor profile. This version is ideal for a cozy, rustic dinner that feels like a warm hug.
Asian Fusion Cups
Use coconut milk instead of water, add sliced shiitake mushrooms, and finish with a drizzle of sesame oil. The result is a silky, umami‑rich loaf that echoes the flavors of a classic Asian stir‑fry.
Sweet Potato Surprise
Incorporate pureed sweet potato into the batter for natural sweetness and a vibrant orange hue. The sweet potato adds moisture and a subtle sweetness that balances the savory elements beautifully.
Storing and Bringing It Back to Life
Fridge Storage
Cool the cups completely before placing them in an airtight container. Store in the refrigerator for up to 4 days. The cups will maintain their moisture and flavor, making them a convenient grab‑and‑go option for busy weekdays.
Freezer Friendly
Wrap each cup individually in parchment paper or plastic wrap and place them in a freezer‑safe bag. They can be frozen for up to 3 months. When ready to eat, thaw overnight in the refrigerator or reheat directly from frozen.
Best Reheating Method
Reheat frozen cups in the oven at 350°F (175°C) for 15–20 minutes, or until heated through. For a quick microwave option, add a splash of water to the cup, cover with a damp paper towel, and heat for 45 seconds. A tiny splash of water before reheating keeps the cups from drying out and restores their original juiciness.