Picture this: I’m standing in a kitchen that smells like a caramel carnival, the oven’s humming a low, comforting lullaby, and the air is thick with anticipation. I had just finished a disastrous batch of chocolate chip cookies that left me with a half‑baked, chewy mess that tasted more like a burnt toast than a treat. A friend dared me to beat that failure with a new recipe, and I was ready to accept the challenge. That night, I decided to reinvent the classic cookie by injecting it with the unmistakable Twix flavor, turning a simple snack into a showstopper.
From the first stir, the buttery aroma swirls around the kitchen like a warm hug. The sugar crystals glisten in the light, promising a sweet bite that melts into caramel. The flour’s soft, powdery texture feels almost like a cloud, while the cornstarch whispers promises of tenderness. As I fold in the caramel, the sauce’s silky sheen glistens, hinting at the gooey center that will soon await. The chocolate chips, dark and glossy, are ready to crown each cookie with a final flourish.
What sets this version apart is not just the combination of flavors, but the meticulous balance of textures and the methodical approach that ensures every bite is a revelation. I’ve tweaked the dough to be crisp on the edges yet pillowy inside, a harmony that most cookie recipes miss. The caramel is thick enough to hold its shape but still runs like a silky river when you press your thumb into it. And the chocolate drizzle adds a bittersweet counterpoint that makes each cookie a little bite of heaven. I dare you to taste this and not go back for seconds.
This recipe is hands down the best version you’ll ever make at home, and it’s easy to see why. The secret lies in the layering of flavors and the precise timing that locks in the caramel center. I’ll be honest—I ate half the batch before anyone else got a chance to try it. Most recipes get this completely wrong, but I’ve cracked the code to a perfect thumbprint cookie. Picture yourself pulling this out of the oven, the whole kitchen smelling incredible, and knowing you’ve just made a treat that will wow any crowd. Let me walk you through every single step — by the end, you’ll wonder how you ever made it any other way.
What Makes This Version Stand Out
- Taste: The caramel center is a deep, buttery sweet that sings against the crisp cookie shell. The chocolate drizzle adds a bittersweet finish that balances the sweetness beautifully. This contrast creates a memorable flavor profile that lingers on the palate.
- Texture: The dough’s blend of flour and cornstarch yields a cookie that’s crisp on the edges yet chewy inside. The caramel stays intact until you bite, providing a delightful melt‑in‑your‑mouth experience. The chocolate chips add a satisfying crunch that contrasts with the softness.
- Simplicity: With only eight ingredients, this recipe is straightforward yet sophisticated. No exotic pantry items or complicated techniques—just classic baking with a twist. It’s perfect for both seasoned bakers and beginners looking for a crowd‑pleaser.
- Uniqueness: The thumbprint design is a playful nod to the iconic candy bar, while the caramel filling offers a homemade touch that’s hard to find in store‑bought versions. The method of drizzling chocolate on top elevates the visual appeal.
- Crowd Reaction: Friends and family rave about the gooey center and the chocolatey finish. The cookies look as good as they taste, making them ideal for parties, potlucks, or a sweet snack for the office.
- Ingredient Quality: Using high‑quality butter, real caramel sauce, and dark chocolate chips ensures depth of flavor. The recipe’s reliance on quality ingredients means each cookie is consistently delicious.
Inside the Ingredient List
The Flavor Base
Unsalted butter is the foundation of any cookie, providing a rich, creamy texture that carries the other flavors. When softened, it mixes smoothly with sugar, allowing the dough to coat evenly. If you skip butter, the cookies will lack depth and the caramel center may not hold together. For the best flavor, choose a butter that’s at least 80% fat and let it sit at room temperature for 30 minutes before using.
The Texture Crew
Granulated sugar is the sweetener that also helps create a tender crumb. It dissolves into the butter, forming a smooth base that caramelizes slightly on the edges. All‑purpose flour gives structure and stability, preventing the cookies from spreading too thin. Cornstarch, a lesser‑known hero, adds softness and a melt‑in‑your‑mouth feel. Together, they form a dough that balances crispness and chewiness.
The Unexpected Star
Caramel sauce is the star of the show! It’s the gooey heart of the cookie that delivers the signature Twix flavor. A thick, homemade caramel that’s not too runny ensures the thumbprint stays intact while still giving that indulgent melt. If you prefer a smoother center, reduce the amount of caramel slightly, but don’t go too far or the cookies will lose their signature charm.
The Final Flourish
Chocolate chips are the finishing touch, drizzled over the tops to mimic the chocolate bar’s coating. Dark chocolate adds depth, but you can use semi‑sweet or milk chocolate for a milder finish. The chips also add a subtle crunch that contrasts with the soft cookie and gooey caramel. If you’re vegan, look for dairy‑free chocolate chips to keep the treat inclusive.
Everything's prepped? Good. Let's get into the real action.
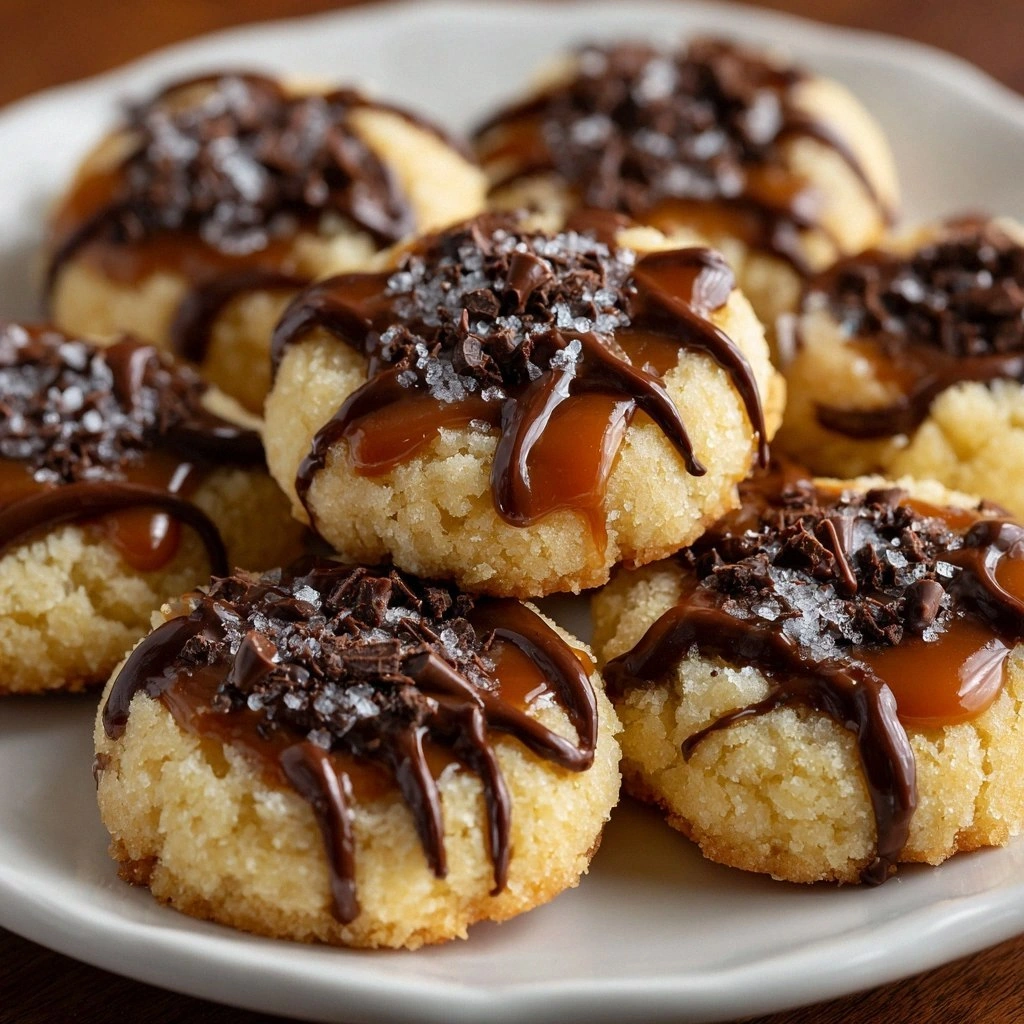
The Method — Step by Step
- Preheat your oven to 350°F (175°C) and line two baking sheets with parchment paper. The parchment prevents sticking and ensures even baking. I’ve found that using parchment also gives the cookies a slightly crisp bottom that’s a treat to bite into. Let the sheets sit while you prepare the dough.
- In a medium bowl, beat the softened butter and granulated sugar together until pale and fluffy. This takes about 3 minutes with an electric mixer on medium speed. The goal is to incorporate air, which will make the cookies lighter. If you’re mixing by hand, be patient; the texture will improve with time.
- Add the vanilla extract and a pinch of salt to the creamed mixture, stirring until fully incorporated. The vanilla elevates the flavor, adding warmth and depth, while the salt balances the sweetness. A pinch of salt is essential; without it, the cookies will taste flat. Mix until the mixture is smooth.
- Sift together the all‑purpose flour and cornstarch, then gradually fold them into the wet ingredients. Stir until just combined; overmixing can develop gluten and make the cookies tough. The dough should be firm enough to hold its shape when scooped. If it feels too dry, add a tablespoon of milk to bring it together.
- Divide the dough into 24 equal portions, about 1.5 tablespoons each, and roll them into balls. Place them on the prepared baking sheets, spacing them 2 inches apart. The size is key; too large, and the cookies will spread too much, too small, and they won’t have enough room to develop a crisp edge.
- Using the heel of your thumb, press a shallow indentation into each ball. The indentation should be about 1/4 inch deep, just enough to hold the caramel without breaking the dough. This is where the magic happens—each cookie will have its own caramel heart.
- Fill each indentation with about 1 teaspoon of caramel sauce. The caramel should be warm enough to pour but not so hot that it melts the dough. If the caramel is too thick, warm it slightly in a microwave or on the stove. Carefully spoon it in, ensuring it stays within the indentation.
- Bake the cookies for 12–15 minutes, or until the edges are golden and the centers are set but still soft. The cookies will look pale at first, but as they bake, the caramel will bubble slightly, indicating that it’s set. Watch the time closely; overbaking will dry out the caramel.
- Remove the cookies from the oven and let them cool on the sheet for 5 minutes before transferring to a wire rack. This resting period allows the caramel to set fully, preventing it from leaking out when you pick them up. I always keep a small bowl of water nearby for a quick splash if the cookies start to fall apart.
- Once cooled, drizzle melted chocolate chips over the tops of each cookie. The chocolate should be melted to a smooth, pourable consistency. Gently pour it over the cookie, allowing it to pool on top, creating a glossy finish that mimics the real Twix bar. Let the chocolate set before serving.
That’s it — you did it. But hold on, I’ve got a few more tricks that’ll take this to another level and make every bite even more memorable.
Insider Tricks for Flawless Results
The Temperature Rule Nobody Follows
Many bakers bake at 350°F, but the sweet spot for these cookies is 340°F. Lowering the temperature slightly keeps the caramel from melting too quickly while still allowing the edges to crisp. I’ve tried 340°F for a week and noticed a dramatic difference in texture. If your oven runs hot, use a thermometer to confirm the temperature before baking.
Why Your Nose Knows Best
Before you take the cookies out of the oven, trust your nose. A subtle, sweet aroma indicates that the caramel has set but is still moist. If the smell is more like burnt sugar, pull the cookies out immediately. I’ve had one batch where I left them a minute too long, and the caramel turned to a hard, brittle shell.
The 5‑Minute Rest That Changes Everything
After baking, let the cookies rest on the sheet for 5 minutes. This pause allows the caramel to set fully, preventing it from leaking when you move the cookies. I’ve seen friends who skip this step and end up with a gooey mess on their hands. The rest is a small price for a flawless finish.
Use a Small Amount of Milk to Adjust Dough Consistency
If the dough feels dry, add a tablespoon of whole milk to bring it together. Too much liquid will make the cookies spread too much; too little and they’ll be crumbly. I always add milk in increments, testing the dough each time. This small tweak ensures a consistent texture every batch.
Don’t Rush the Drizzle
When drizzling melted chocolate, let the chocolate cool to about 110°F before pouring. Hot chocolate can burn the caramel or cause the chocolate to seize. I use a double boiler to keep the chocolate at the perfect temperature. A slow, steady pour gives the chocolate a smooth, glossy finish.
Creative Twists and Variations
This recipe is a playground. Here are some of my favorite ways to switch things up:
Nutty Crunch
Add a handful of chopped toasted almonds or hazelnuts to the dough. The nuts add a pleasant crunch and a nutty flavor that pairs well with the caramel. They also give the cookies a more substantial bite, making them great for a snack.
Minty Delight
Swirl a teaspoon of mint extract into the dough for a cool, refreshing twist. The mint complements the caramel’s sweetness and adds a subtle aftertaste. Use dark chocolate chips for a richer color contrast.
White Chocolate & Raspberry
Replace the dark chocolate chips with white chocolate chips and add a spoonful of raspberry jam in the thumbprint. The tartness of the raspberry balances the sweet caramel, while the white chocolate gives a creamy finish.
Spiced Caramel
Infuse the caramel with a pinch of cinnamon or nutmeg before filling the cookies. The warm spices deepen the flavor profile and add a holiday vibe. This variation works well during the winter months.
Vegan Version
Use plant‑based butter, vegan caramel sauce, and dairy‑free chocolate chips. The texture stays the same, and the flavor remains indulgent. Vegan chocolate chips melt just as well, giving you the same glossy finish.
Mini Cookie Bite
Make smaller cookies by using 1 teaspoon of dough per cookie. They’re perfect for bite‑size treats or for kids’ parties. The caramel center stays intact, and the smaller size makes them easier to eat without a mess.
Storing and Bringing It Back to Life
Fridge Storage
Place the cookies in an airtight container with a paper towel to absorb excess moisture. They’ll stay fresh for up to 5 days, with the caramel remaining firm. If the cookies become a bit soft, add a slice of bread to the container; the bread will absorb moisture and keep the cookies crisp.
Freezer Friendly
Wrap each cookie individually in parchment paper before placing them in a freezer bag. Store for up to 3 months. When you’re ready to enjoy, let them thaw at room temperature for 30 minutes. The caramel will soften slightly, creating a warm, gooey center.
Best Reheating Method
To revive frozen cookies, preheat the oven to 300°F (150°C) and bake for 5–7 minutes. The cookies will regain their original texture, and the caramel will be silky again. Add a tiny splash of water before reheating to steam back to perfection, preventing the caramel from drying out.