I still remember the first time I attempted a caramel cheesecake. It was a rainy Thursday, my kitchen smelled like wet dog and desperation, and I was armed with nothing but a block of cream cheese, a vague memory of a recipe I'd seen on social media, and the kind of blind confidence that only a sugar craving can inspire. What emerged from my oven was a cracked, weeping disaster that tasted like sweetened cardboard and looked like it had been run over by a truck. My friends politely nibbled the edges. I ate the rest standing over the sink, swearing I'd never bake again. Fast forward three years, hundreds of test batches, and one small kitchen fire later, and here we are: the caramel drip cheesecake that made me believe in second chances. This isn't just another dessert; it's the dessert that'll ruin all other cheesecakes for you forever.
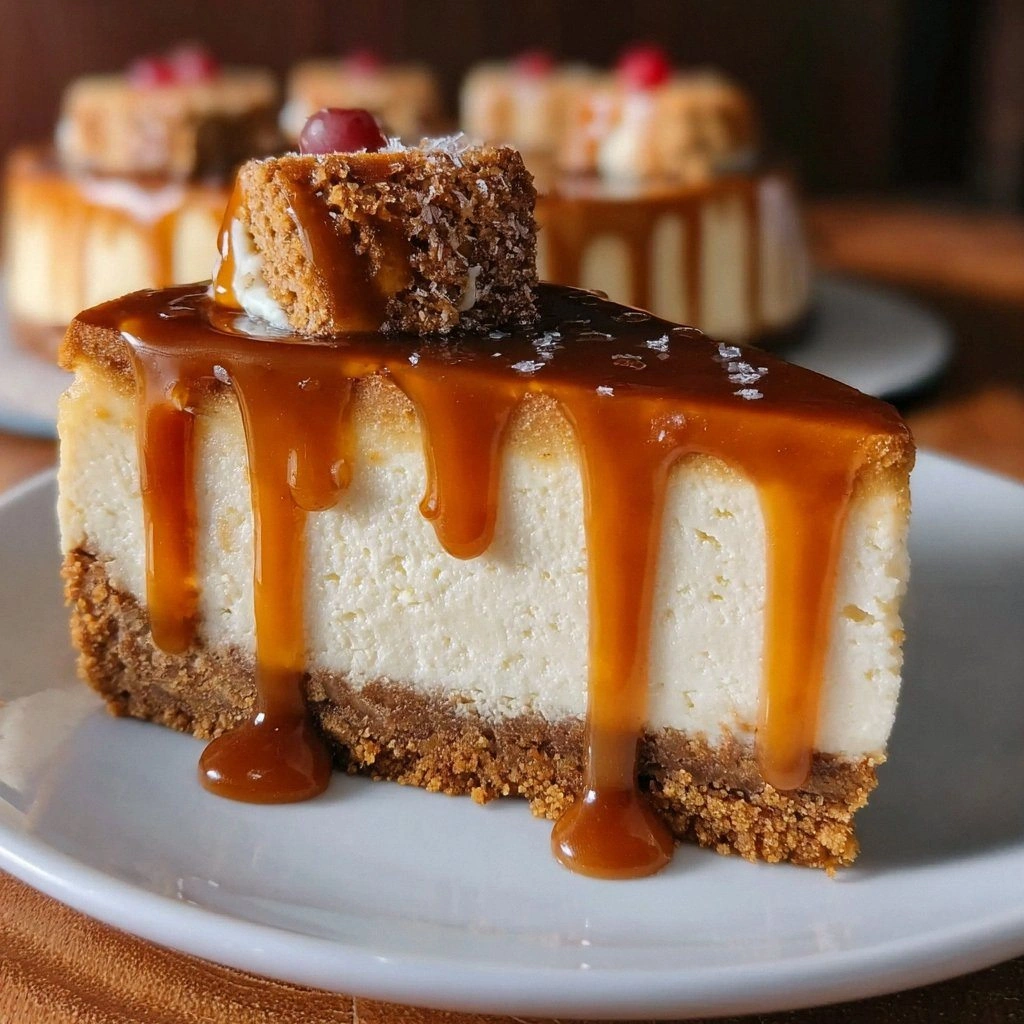
Picture this: a crust so buttery and crisp it shatters under your fork like thin ice on a winter pond, giving way to a filling so silk-smooth and cloud-light it practically floats off the plate. The caramel — oh, the caramel — isn't that sad, grainy stuff that slides off in sheets. We're talking about a glossy, slow-dripping lava of burnt sugar and cream that pools in glossy ribbons, each bite delivering that perfect push-pull of sweet and salty that makes your taste buds do a little happy dance. The edges caramelize just enough to give you those chewy, almost-burnt bits that serious dessert people live for. I dare you to taste this and not go back for seconds. Actually, I dare you to make it through the cooling period without "testing" at least three spoonfuls of the filling. (I'll be honest — I ate half the batch before anyone else got to try it. No regrets.)
What makes this version different? Most recipes get this completely wrong. They'll tell you to dump a can of store-bought caramel on top and call it a day, or worse, they have you making caramel with corn syrup and condensed milk like we're living in the 1950s. Here's what actually works: a crust that gets pre-baked until it smells like graham cracker toffee, a filling that uses sour cream for tang and heavy cream for that mousse-like texture, and a caramel that starts with dry sugar — no water, no corn syrup, just pure alchemy. The result? A cheesecake that's restaurant-quality but made in your own kitchen, with ingredients you can pronounce and techniques that'll make you feel like a pastry wizard.
Okay, ready for the game-changer? We're using flaky sea salt in both the crust and the caramel, but we're adding it at different stages for maximum impact. The crust gets a whisper to enhance the graham cracker's natural sweetness, while the caramel gets a generous shower that makes the burnt sugar sing. Future pacing here: picture yourself pulling this out of the oven, the whole kitchen smelling like a French patisserie, your neighbors knocking on the door because the aroma has drifted down the hallway. Stay with me here — this is worth it. Let me walk you through every single step — by the end, you'll wonder how you ever made it any other way.
What Makes This Version Stand Out
Texture Paradise: This isn't your dense, New York-style brick. We're talking cloud-light, almost mousse-like filling that melts on your tongue while still maintaining that signature cheesecake richness. The secret? Whipping the cream cheese until it's impossibly fluffy before adding anything else, then folding in whipped cream at the end. Most recipes get this completely wrong by over-mixing after adding eggs, which creates that heavy, almost rubbery texture. Not here.
Caramel That Actually Works: Listen, I've cried over more failed caramel attempts than I care to admit. This method uses the dry caramel technique — no water, no corn syrup, just pure sugar slowly melting until it reaches that perfect amber color. The result is a caramel with actual depth, not just sweetness. It coats the back of a spoon like liquid gold and drips down the sides of your cheesecake in slow-motion ribbons that'll make your Instagram followers weep with envy.
Salt Strategy: Anyone can dump salt into a recipe. We're using it like a seasoning pro — flaky sea salt in the crust to make the graham crackers taste more like themselves, a pinch in the filling to balance the sweetness, and a generous sprinkle in the caramel to create that addictive sweet-salty balance that keeps people coming back for "just one more sliver" until the whole thing disappears.
Make-Ahead Magic: Here's what actually works: this cheesecake tastes better on day two. The flavors meld, the texture sets perfectly, and the caramel absorbs just slightly into the top layer creating this amazing marbled effect. I make this for dinner parties and serve it straight from the fridge while my guests are still licking their appetizer plates. The compliments last for days.
Ingredient Quality Matters: We're using full-fat everything here because this is not the time for diet substitutions. Full-fat cream cheese creates that luxurious texture, real vanilla extract (never imitation — I can taste the difference from across the room), and European-style butter with its higher fat content for the richest crust possible. Cheap out on ingredients and you'll get a cheap-tasting dessert.
Technique Over Gadgets: No water bath, no special pans, no fancy equipment. Just a regular springform pan and some basic kitchen tools. I've tested this in everything from a tiny apartment oven to a professional kitchen, and it works every single time because we're using techniques that account for real-world conditions, not ideal test kitchen scenarios.
Crowd Psychology: Bring this to any gathering and watch what happens. People who claim they "don't really like sweets" will ask for the recipe. Kids will abandon their chocolate cake for this. Someone will definitely try to take the last piece home in a napkin. I've seen marriages proposed over this cheesecake. Okay, maybe just one, but still.
Inside the Ingredient List
The Flavor Base
Graham cracker crumbs aren't just a convenience item — they're the foundation of flavor here. I use the honey-flavored ones because they bring their own subtle sweetness that plays beautifully with the caramel. When you mix them with melted butter and a touch of sugar, then bake them until they're golden and fragrant, they transform into something that tastes like the love child of a cookie and a cracker. Skip the pre-made crumbs and crush your own; the texture is better and you won't get those weird powdery bits that commercial crumbs sometimes have.
Unsalted butter is non-negotiable because we want to control the salt level precisely. European-style butter with its 82% fat content creates a richer, more tender crust that practically melts in your mouth. Don't substitute with margarine or oil — the water content is different and you'll end up with a soggy base that falls apart when you try to slice it. The butter should be melted but not hot when you mix it with the crumbs; too hot and it'll make the crust greasy instead of crisp.
The Texture Crew
Full-fat cream cheese is the star, and I mean the brick kind, not the whipped stuff in a tub. The whipped variety has air beaten into it, which throws off the ratios and gives you a filling that collapses instead of setting properly. Let it come to room temperature naturally — this isn't the place for shortcuts. Cold cream cheese will give you lumps that no amount of mixing will smooth out, and over-microwaved cream cheese becomes oily and separated. You want it soft enough that your finger leaves an impression, but not so warm it's starting to melt.
Sour cream brings the tang that balances all that richness, plus it loosens the filling just enough to make it spoonable without being runny. Full-fat Greek yogurt works in a pinch, but it makes the filling slightly grainier and less silky. The sour cream should also be at room temperature for the same reasons as the cream cheese — cold dairy creates lumps, and lumps are the enemy of smooth cheesecake. I once tried using low-fat sour cream to "lighten" the recipe and ended up with something that tasted like diet food sadness.
The Unexpected Star
Heavy cream gets whipped to soft peaks and folded in at the very end, and this is what gives us that mousse-like texture that makes people ask "Wait, this is cheesecake?" It's like cheating but totally legal. The cream should be cold straight from the fridge — warm cream won't whip properly and you'll end up with sweetened butter instead of whipped cream. I use 35% fat content cream because anything lower won't hold its structure, and anything higher makes the filling too rich (yes, that's a thing).
The Final Flourish
The caramel starts with just granulated sugar, but here's where it gets interesting: we're letting it go darker than most recipes dare. Most people pull their caramel when it's light amber, but we're going for a deep mahogany that borders on burnt. This creates a complex, almost bitter backbone that prevents the whole dessert from becoming cloyingly sweet. The sugar should smell like it's on the edge of burning — that's when you know it's ready. Too light and it's just sweet syrup, too dark and it becomes bitter and unusable. This is where practice pays off, but even your "failures" make incredible ice cream topping.
Everything's prepped? Good. Let's get into the real action...
The Method — Step by Step
- Start with your crust because it needs time to cool completely. Mix your graham cracker crumbs with the sugar and salt in a medium bowl, then pour in the melted butter and stir until everything looks like wet sand. The mixture should hold together when you squeeze it in your palm but still feel crumbly. Press it into your springform pan using the bottom of a measuring cup — really pack it in there, especially around the edges where it tends to be thinner. This isn't the time for gentle handling; you want it compressed enough that it won't crumble when you slice the finished cheesecake.
- Bake the crust at 350°F for 10-12 minutes until it smells like graham cracker toffee and the edges are just starting to turn golden. This step is crucial — underbaked crust will be soggy and fall apart, while overbaked becomes too hard to cut through. Your kitchen should smell like you're making the world's best cookie. Let it cool completely while you make the filling; a warm crust will melt your cream cheese and give you a greasy base.
- Now for the filling — this is where most people mess up by over-mixing. Beat your room-temperature cream cheese on medium speed for exactly 3 minutes until it's light and fluffy like whipped butter. Scrape down the bowl twice during mixing to ensure everything gets incorporated. The texture should be completely smooth with no lumps. This is the moment of truth — if your cream cheese isn't smooth now, it never will be.
- Add the sugar in a slow stream while mixing on low speed, then bump it up to medium for another 2 minutes. The mixture should look like thick frosting and be significantly lighter in color than when you started. Don't rush this step — properly creamed cream cheese incorporates air that gives us that fluffy texture. If you've ever had dense cheesecake, it's because someone skipped or rushed this step.
- Beat in the sour cream and vanilla until just combined, about 30 seconds. Then add the eggs one at a time, mixing each just until the yolk disappears. Over-mixing after adding eggs incorporates too much air and causes cracks during baking. The batter should be smooth and pourable but still thick enough to mound slightly when you lift the beater.
- Here comes the magic — whip your cold heavy cream to soft peaks in a separate bowl. They should hold their shape but still be pillowy, not stiff. Gently fold this into your cream cheese mixture using a large rubber spatula, making figure-eights and scraping around the edges. This keeps the air we just whipped into the cream, giving us that mousse-like texture. The final batter should be light and spoonable, like very thick whipped cream.
- Pour the filling over your cooled crust and smooth the top with an offset spatula. Bake at 325°F for 50-60 minutes until the edges are set but the center still jiggles like Jell-O when you gently shake the pan. It should look underdone — that's perfect. The residual heat will finish cooking it as it cools. If you wait until the center is firm, you'll end up with an overbaked, cracked disaster.
- Turn off the oven and crack the door open with a wooden spoon. Let the cheesecake cool in the oven for 1 hour — this prevents the sudden temperature change that causes cracks. Then remove it and let it cool completely on a rack before refrigerating for at least 4 hours or overnight. I know it's torture, but cutting into warm cheesecake is like eating cream cheese soup. Good things come to those who wait.
- For the caramel, which you can make while the cheesecake cools, start with a clean, dry saucepan over medium heat. Add the sugar in an even layer and resist every urge to stir. Just let it melt and caramelize, swirling the pan occasionally to distribute heat. When it reaches a deep amber color and smells like it's on the edge of burning, immediately remove from heat and carefully whisk in the warm cream. It'll bubble violently — this is normal. Add the butter and salt, whisk until smooth, and let it cool until it's thick but still pourable.
That's it — you did it. But hold on, I've got a few more tricks that'll take this to another level...
Insider Tricks for Flawless Results
The Temperature Rule Nobody Follows
Room temperature isn't just a suggestion — it's the difference between success and disaster. Every dairy product needs to be at the same temperature before you start mixing, otherwise you'll get lumps that refuse to blend. I set everything out 2 hours before I plan to bake, and if I'm in a rush, I'll submerge sealed packages in lukewarm water for 15 minutes. Cold cream cheese will never fully incorporate, and warm cream will deflate when you try to whip it. This isn't the place for shortcuts unless you enjoy the texture of cottage cheese in your dessert.
Why Your Nose Knows Best
Trust your sense of smell more than your eyes when making caramel. Visual cues can be deceiving depending on your pan and lighting, but smell never lies. When the sugar starts smelling like toasted nuts and just begins to take on a bitter edge, it's ready. Too light and it's just sweet syrup, too dark and it becomes bitter and acrid. I ruined three batches before I learned to trust my nose over my eyes. Now I can make caramel blindfolded just by smell alone, which is either impressive or deeply concerning depending on who you ask.
The 5-Minute Rest That Changes Everything
After mixing your filling, let it rest for 5 minutes before pouring it over the crust. This allows any large air bubbles to rise and pop, giving you a smoother top that won't crack during baking. I learned this from a pastry chef who swore by it, and she was right — my cheesecakes went from consistently cracked to consistently perfect. Just cover the bowl with plastic wrap and let it sit while you clean up your workspace. Those five minutes feel like forever when you're eager to bake, but they're worth it for that flawless finish.
Creative Twists and Variations
This recipe is a playground. Here are some of my favorite ways to switch things up:
Chocolate Lover's Dream
Replace half the graham cracker crumbs with chocolate cookie crumbs and add 2 tablespoons of cocoa powder to the filling. The result is a mocha-caramel situation that tastes like the best tiramisu you've ever had, but richer and more indulgent. Drizzle the top with dark chocolate ganache instead of caramel for the ultimate chocolate experience. This version converts even the most dedicated vanilla purists.
Salted Maple Bourbon
Swap the caramel for maple syrup cooked down with a splash of bourbon and finish with flaky salt. The maple brings a deeper, more complex sweetness than regular sugar, while the bourbon adds warmth and sophistication. This version is particularly stunning in the fall when served with a cup of strong coffee. Your brunch guests will think you're a culinary genius.
Tropical Escape
Add the zest of two limes to the filling and replace the caramel with a coconut-lime curd. The bright citrus cuts through the richness beautifully, creating a dessert that tastes like vacation in every bite. Top with toasted coconut flakes for texture and visual appeal. This version is dangerously refreshing and perfect for summer gatherings when you want something rich but not heavy.
Coffee Shop Special
Dissolve 2 tablespoons of instant espresso powder in the vanilla extract before adding it to the filling. The coffee flavor intensifies the caramel notes and creates a sophisticated dessert that tastes like the best coffee cake you've never had. Serve this version after a dinner party with a glass of dessert wine and watch your guests swoon.
Berry Burst
Swirl 1/2 cup of raspberry or blackberry puree through the filling before baking, creating gorgeous marbled patterns. The tart berries provide the perfect counterpoint to the sweet caramel, and the colors are absolutely stunning. This version looks like it came from a boutique bakery and tastes even better than it looks.
Pumpkin Spice (But Make It Good)
Add 1/2 cup of pumpkin puree and 1 teaspoon of pumpkin pie spice to the filling for a autumnal version that doesn't taste like a scented candle. The pumpkin adds moisture and a subtle earthiness that works surprisingly well with the caramel. This version has converted even the most vocal pumpkin spice haters in my life.
Storing and Bringing It Back to Life
Fridge Storage
Wrap your cooled cheesecake tightly in plastic wrap, then again in foil, and it'll keep for up to 5 days in the refrigerator. The flavors actually improve after a day or two as everything melds together. Store the caramel separately in a jar — it'll keep for 2 weeks and is amazing on everything from ice cream to your morning coffee. When you're ready to serve, let the cheesecake sit at room temperature for 30 minutes to take the chill off; cold mutes flavors and textures.
Freezer Friendly
This cheesecake freezes beautifully for up to 3 months. Wrap individual slices in plastic wrap, then foil, and store in a freezer bag. Thaw overnight in the refrigerator, not on the counter, to prevent condensation from making the crust soggy. The caramel also freezes well in ice cube trays — pop out a cube and microwave for 20 seconds for instant dessert sauce. I've been known to keep emergency caramel cubes in my freezer for dessert emergencies.
Best Reheating Method
While you shouldn't reheat the entire cheesecake, individual slices can be gently warmed if you prefer your caramel a little runnier. Microwave a slice for 10-15 seconds, just until the caramel starts to loosen and the filling softens slightly. Add a tiny splash of water to the caramel before reheating — it steams back to perfection. This is particularly delicious on cold winter nights when you want something comforting but don't want to bake.