Love this? Pin it for later! 📌
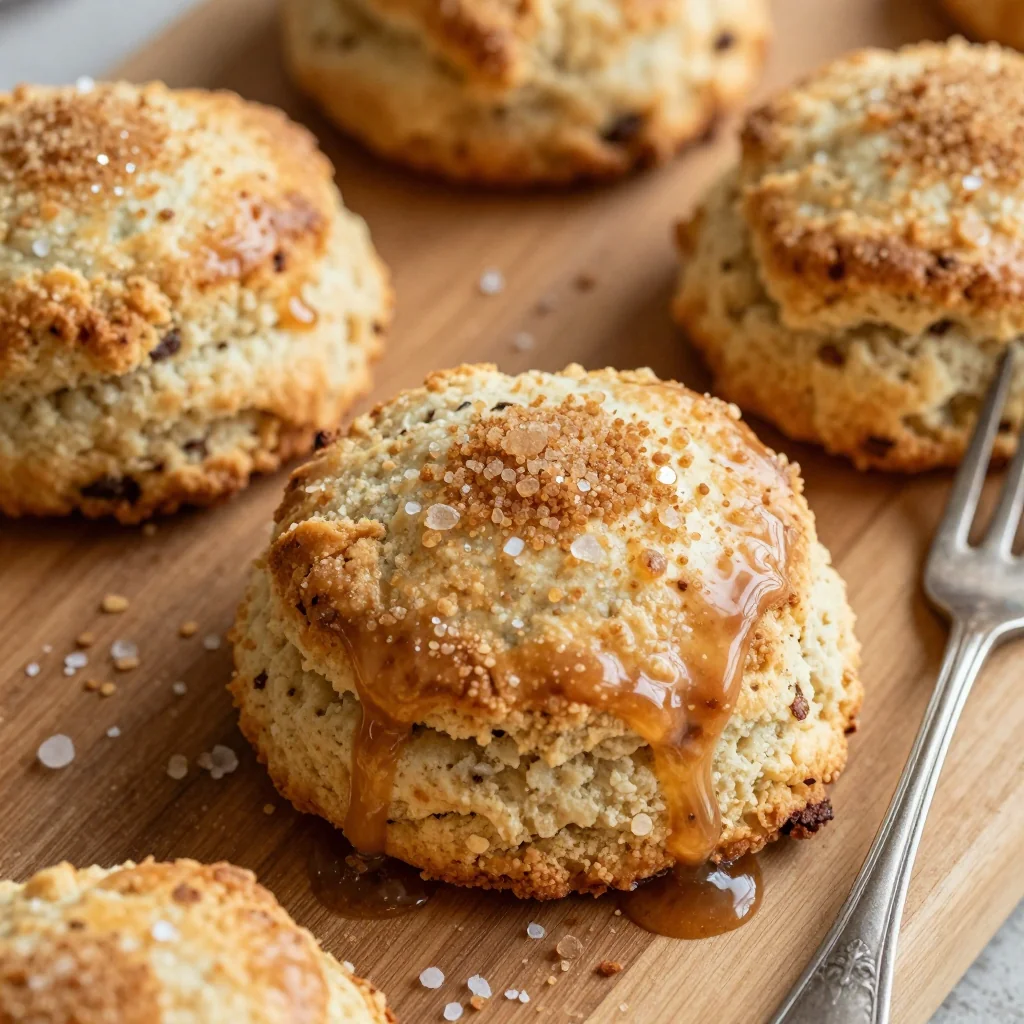
There's something magical about the aroma of warm cinnamon and brown sugar wafting through your kitchen on a lazy weekend morning. These tender, flaky scones have become my signature breakfast treat—perfect for everything from intimate brunches to holiday gatherings. After countless iterations and taste tests (my neighbors never complain about being guinea pigs!), I've perfected a recipe that delivers bakery-quality results right in your own kitchen.
What started as a desperate attempt to recreate my favorite coffee shop scone has evolved into a cherished family tradition. Every Sunday, my daughter and I wake up early to make these together, creating memories while the rest of the house slowly comes alive. The combination of rich brown sugar and aromatic cinnamon creates an irresistible fragrance that draws everyone to the kitchen, still in their pajamas, eagerly awaiting that first warm bite.
These scones strike the perfect balance between indulgent and approachable. They're impressive enough for special occasions—I've served them at bridal showers, Mother's Day brunches, and holiday mornings—yet simple enough for everyday baking. The secret lies in the technique: keeping the butter cold, handling the dough gently, and not overmixing. Master these elements, and you'll achieve those coveted flaky layers that make scones so irresistible.
Why This Recipe Works
- Ultra-flaky texture: Cold butter creates steam pockets during baking, resulting in perfectly layered, tender scones
- Perfect sweetness: Brown sugar adds depth and moisture while cinnamon provides warm, comforting flavor
- Make-ahead friendly: Freeze unbaked scones for up to 3 months, baking fresh whenever cravings strike
- Versatile base: Easy to customize with add-ins like nuts, dried fruit, or chocolate chips
- Beginner-friendly: Detailed instructions ensure success even for novice bakers
- Quick to prepare: Ready in under 45 minutes, perfect for impromptu brunch guests
- Freezer-friendly dough: Double the batch and freeze half for later convenience
Ingredients You'll Need
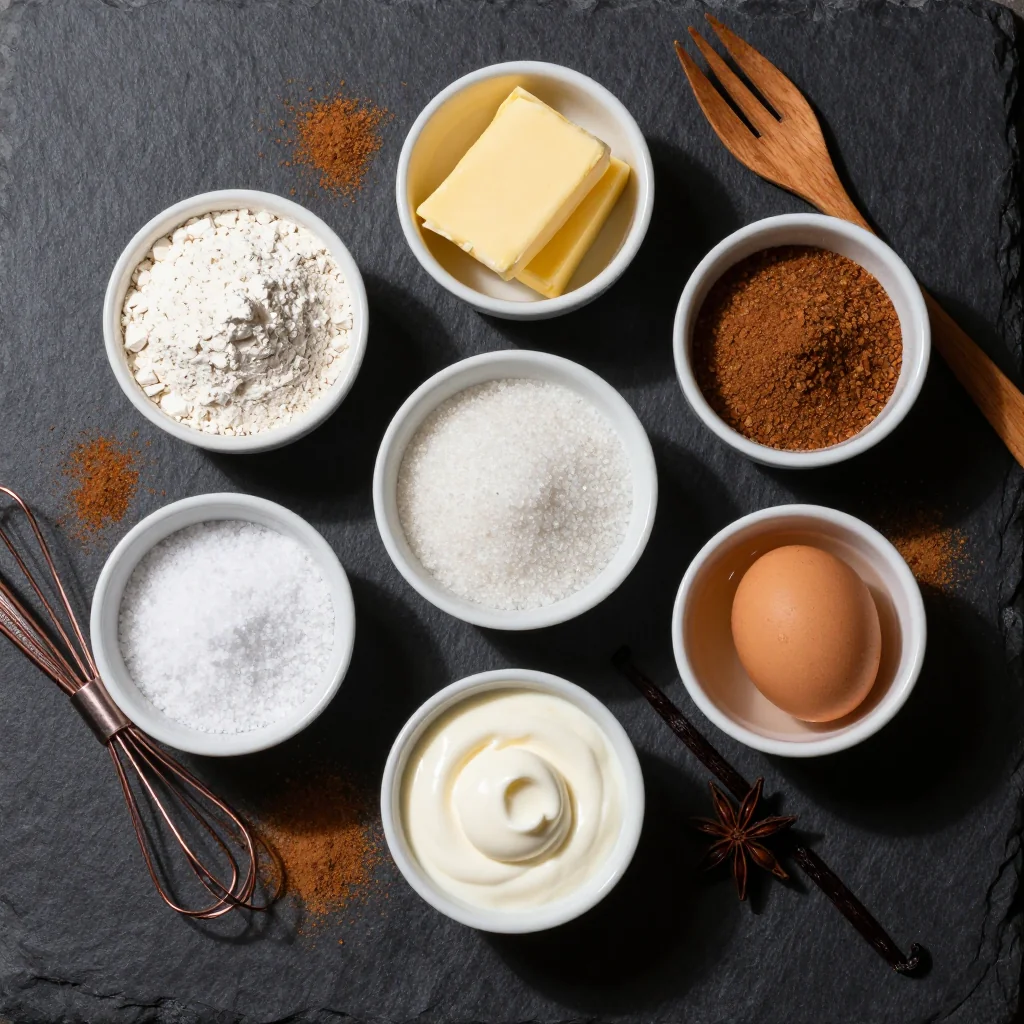
Quality ingredients make all the difference in these scones. Let's break down each component and why it matters:
All-purpose flour (3 cups) forms the structure of your scones. I recommend using a high-quality brand like King Arthur or Bob's Red Mill for consistent results. The protein content in these brands helps create the perfect tender crumb. If you live in a particularly humid climate, you might need to add an extra tablespoon or two of flour.
Cold unsalted butter (3/4 cup) is crucial for flaky layers. I freeze my butter for 30 minutes before starting, then grate it using a box grater. This creates tiny butter pieces that distribute evenly throughout the dough. European-style butter with higher fat content yields even richer results.
Brown sugar (1/2 cup) adds moisture and that wonderful caramel flavor. I prefer dark brown sugar for its deeper molasses notes, but light brown works beautifully too. Make sure it's fresh and soft—if it's hardened, microwave it for 10-15 seconds with a damp paper towel.
Ground cinnamon (2 teaspoons) should be fresh and fragrant. I buy whole cinnamon sticks and grind them as needed for the most intense flavor. If using pre-ground, check the expiration date—spices lose potency over time.
Heavy cream (1 cup) creates the most tender, rich scones. Full-fat is essential here—no substitutions if you want authentic bakery-style results. Keep it ice-cold until the moment you add it to the dough.
Eggs (1 large) provide structure and richness. Use room temperature eggs for better incorporation, but keep everything else cold.
Baking powder (1 tablespoon) and baking soda (1/2 teaspoon) work together for perfect lift. Make sure they're fresh—test baking powder by adding hot water (should bubble immediately).
Salt (1 teaspoon) balances the sweetness and enhances all the other flavors. I use fine sea salt for even distribution.
Pure vanilla extract (2 teaspoons) rounds out the flavors beautifully. Never use imitation vanilla in baking—it makes a noticeable difference.
How to Make Warm Brown Sugar Cinnamon Breakfast Scones for a Sweet Treat
Prepare Your Ingredients and Workspace
Start by placing your mixing bowl and pastry cutter in the freezer for 15 minutes. This keeps everything cold, which is crucial for flaky scones. Line a baking sheet with parchment paper and preheat your oven to 400°F (200°C). Grate your frozen butter using the large holes of a box grater, then return it to the freezer while you measure other ingredients.
Mix the Dry Ingredients
In your chilled large mixing bowl, whisk together flour, brown sugar, cinnamon, baking powder, baking soda, and salt. Make sure to break up any brown sugar lumps. Create a well in the center of the mixture. This well will help incorporate the wet ingredients evenly without overmixing.
Cut in the Butter
Remove your grated butter from the freezer and sprinkle it over the flour mixture. Using a pastry cutter or your fingertips (work quickly to avoid warming the butter), cut the butter into the flour until it resembles coarse crumbs with some pea-sized pieces remaining. These larger butter pieces create steam pockets that result in flaky layers.
Combine Wet Ingredients
In a separate small bowl, whisk together the heavy cream, egg, and vanilla extract until well combined. Make a well in the center of your flour-butter mixture and pour in the wet ingredients. Using a fork, gently toss and stir just until the dough starts to come together. It should look shaggy and slightly dry in places.
Knead the Dough Gently
Turn the shaggy dough onto a lightly floured surface. Using floured hands, gently knead the dough 4-5 times, just until it holds together. Be careful not to overknead—this develops gluten and creates tough scones. The dough should still look slightly rough and have visible butter pieces. Pat it into a rough rectangle about 1-inch thick.
Shape and Cut
Using a sharp knife or bench scraper, cut the dough into 8 equal triangles (like cutting a pizza) or use a 2.5-inch biscuit cutter for round scones. When using a cutter, press straight down without twisting, which seals the edges and prevents proper rising. Place the scones on your prepared baking sheet, leaving 2 inches between each one.
Chill Before Baking
Place the entire baking sheet in the freezer for 15 minutes (or refrigerator for 30 minutes). This crucial step solidifies the butter again, ensuring maximum flakiness. While the scones chill, whisk together one egg with one tablespoon of cream for the egg wash.
Apply Egg Wash and Sugar
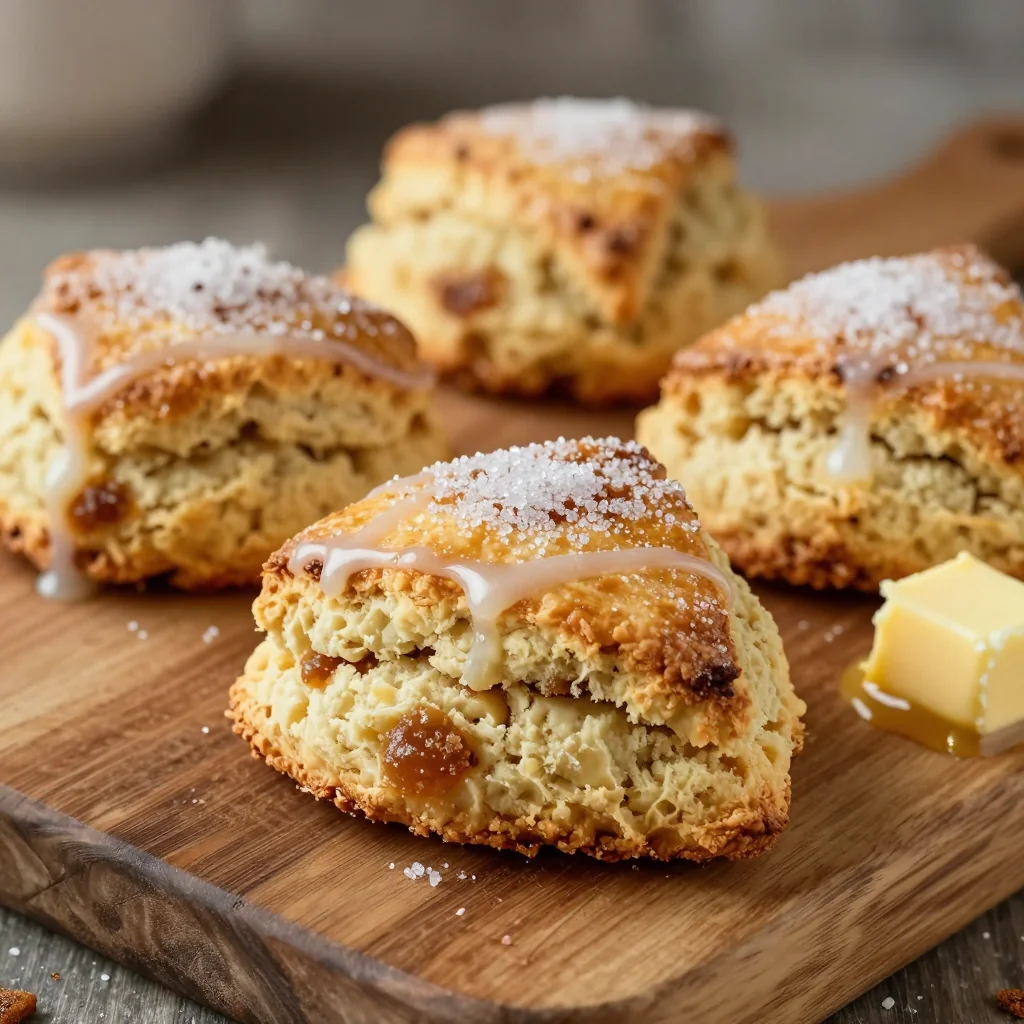
Remove scones from freezer and brush the tops generously with egg wash. This creates that beautiful golden-brown shine. Sprinkle with coarse sugar for extra crunch and sparkle. You can also mix a little cinnamon with the sugar for additional flavor.
Bake to Perfection
Bake for 18-22 minutes, rotating the pan halfway through, until the scones are golden brown on top and bottom. They're done when they feel firm and a toothpick inserted in the center comes out clean. The tops should spring back lightly when touched.
Cool and Serve
Let the scones cool on the baking sheet for 5 minutes, then transfer to a wire rack. Serve warm with butter, clotted cream, or your favorite jam. These are best enjoyed the day they're made, but we'll cover storage tips later to keep them fresh longer.
Expert Tips
Keep Everything Cold
Warm butter equals flat, dense scones. If your kitchen is warm, chill your flour in the freezer for 15 minutes before starting. Work quickly and return dough to the refrigerator if it becomes too soft.
Handle Gently
Overworking develops gluten, creating tough scones. Mix just until combined, knead minimally, and don't reroll scraps more than once. Those rough edges actually bake up beautifully crisp.
Sharp Cutter
Use a sharp biscuit cutter or knife and press straight down. Twisting seals edges and prevents proper rising. Dip your cutter in flour between cuts for clean edges.
Don't Skip the Chill
This crucial step prevents spreading and ensures maximum flakiness. If short on time, 10 minutes in the freezer is better than nothing, but 30 minutes in the refrigerator is ideal.
Watch Closely
Oven temperatures vary. Start checking at 16 minutes. They're done when golden brown and firm to touch. Overbaking creates dry scones, while underbaking leaves them doughy.
Flavor Boost
Variations to Try
Apple Cinnamon
Fold in 1 cup of finely diced, peeled apples (Granny Smith works best) into the dough. Increase cinnamon to 1 tablespoon and add 1/2 teaspoon of apple pie spice. Serve with apple butter.
Maple Pecan
Replace 2 tablespoons of brown sugar with maple sugar. Fold in 3/4 cup toasted pecans, roughly chopped. Drizzle cooled scones with a maple glaze (1 cup powdered sugar + 2 tablespoons maple syrup).
Cinnamon Chip
Add 1 cup of cinnamon chips to the dough along with the wet ingredients. These melt into pockets of cinnamon goodness throughout. Top with a simple vanilla glaze for extra indulgence.
Pumpkin Spice
Replace 2 tablespoons of cream with pumpkin puree. Add 1 teaspoon pumpkin pie spice along with the cinnamon. These are especially perfect for fall mornings.
Cranberry Orange
Add 1 tablespoon orange zest to the dry ingredients. Fold in 3/4 cup dried cranberries. The tart berries complement the sweet cinnamon perfectly.
Chocolate Swirl
Melt 2 ounces dark chocolate and marble it through the dough for a cinnamon-chocolate twist. Top with chocolate shavings for extra decadence.
Storage Tips
Store cooled scones in an airtight container at room temperature for up to 2 days. Place a paper towel in the container to absorb excess moisture. To refresh, wrap in foil and warm in a 300°F oven for 5-7 minutes. Avoid the microwave—it makes them rubbery.
While not ideal (refrigeration can dry them out), you can refrigerate for up to 5 days. Wrap each scone individually in plastic wrap, then place in an airtight container. Bring to room temperature before serving, or warm as directed above.
Freeze individual scones on a baking sheet until solid, then transfer to a freezer bag for up to 3 months. Thaw overnight at room temperature or warm from frozen in a 325°F oven for 15-20 minutes. They're almost as good as fresh!
Freeze unbaked scones on a tray until solid, then store in a freezer bag for up to 3 months. Bake from frozen—just add 3-5 extra minutes to the baking time. This is perfect for having fresh scones anytime without the prep work!
Frequently Asked Questions
I don't recommend substituting buttermilk for heavy cream as it changes the texture significantly. Heavy cream's high fat content creates tender, rich scones. If you must substitute, use half-and-half with 2 tablespoons melted butter added, but expect slightly different results.
This usually happens when the butter becomes too warm before baking. Ensure your dough is well-chilled before baking, and check that your oven temperature is accurate with an oven thermometer. Also, avoid overworking the dough, which can warm the butter.
Yes! Substitute the all-purpose flour with a 1:1 gluten-free baking blend (like Bob's Red Mill or King Arthur). Add 1 teaspoon xanthan gum if your blend doesn't include it. Handle the dough more gently as gluten-free doughs are more delicate.
Scones are done when they're golden brown on top and bottom, feel firm when lightly touched, and a toothpick inserted in the center comes out clean. They should have doubled in height and feel light for their size when picked up.
You can reduce the brown sugar to 1/3 cup, but don't eliminate it entirely as it affects both flavor and texture. For less sweetness, try substituting 2 tablespoons of the brown sugar with coconut sugar or maple sugar, which have lower glycemic impact.
Use two forks or your fingertips to cut in the butter. Work quickly to avoid warming the butter. You can also freeze the butter and grate it directly into the flour, then toss to coat—this method is actually my favorite for achieving perfect texture.
Warm Brown Sugar Cinnamon Breakfast Scones for a Sweet Treat
Ingredients
Instructions
- Prepare: Preheat oven to 400°F (200°C). Line baking sheet with parchment.
- Mix dry: Whisk flour, brown sugar, cinnamon, baking powder, baking soda, and salt in a large bowl.
- Add butter: Cut in frozen grated butter until mixture resembles coarse crumbs.
- Add wet: Whisk cream, egg, and vanilla. Add to dry ingredients and mix just until combined.
- Knead: Turn onto floured surface and knead gently 4-5 times. Pat into 1-inch thick rectangle.
- Cut: Cut into 8 triangles or use biscuit cutter. Place on prepared sheet.
- Chill: Freeze for 15 minutes. Brush with egg wash and sprinkle with sugar.
- Bake: Bake 18-22 minutes until golden brown. Cool 5 minutes before serving.
Recipe Notes
For best results, keep all ingredients cold and avoid overmixing. Freeze unbaked scones for up to 3 months—bake from frozen, adding 3-5 extra minutes. Store baked scones in airtight container at room temperature for 2 days or freeze for up to 3 months.