I still remember the day I ruined a perfectly good tiramisu. There I was, standing in my tiny apartment kitchen, coffee dripping down the counter, cocoa powder in my hair, and a soggy mess of ladyfingers staring back at me like they were personally offended. My Italian grandmother would have disowned me on the spot. But here's the twist — that disaster led me to create what is now my most-requested dessert: a raspberry tiramisu so good, it made my coffee-obsessed friends convert to team fruit faster than you can say "mascarpone."
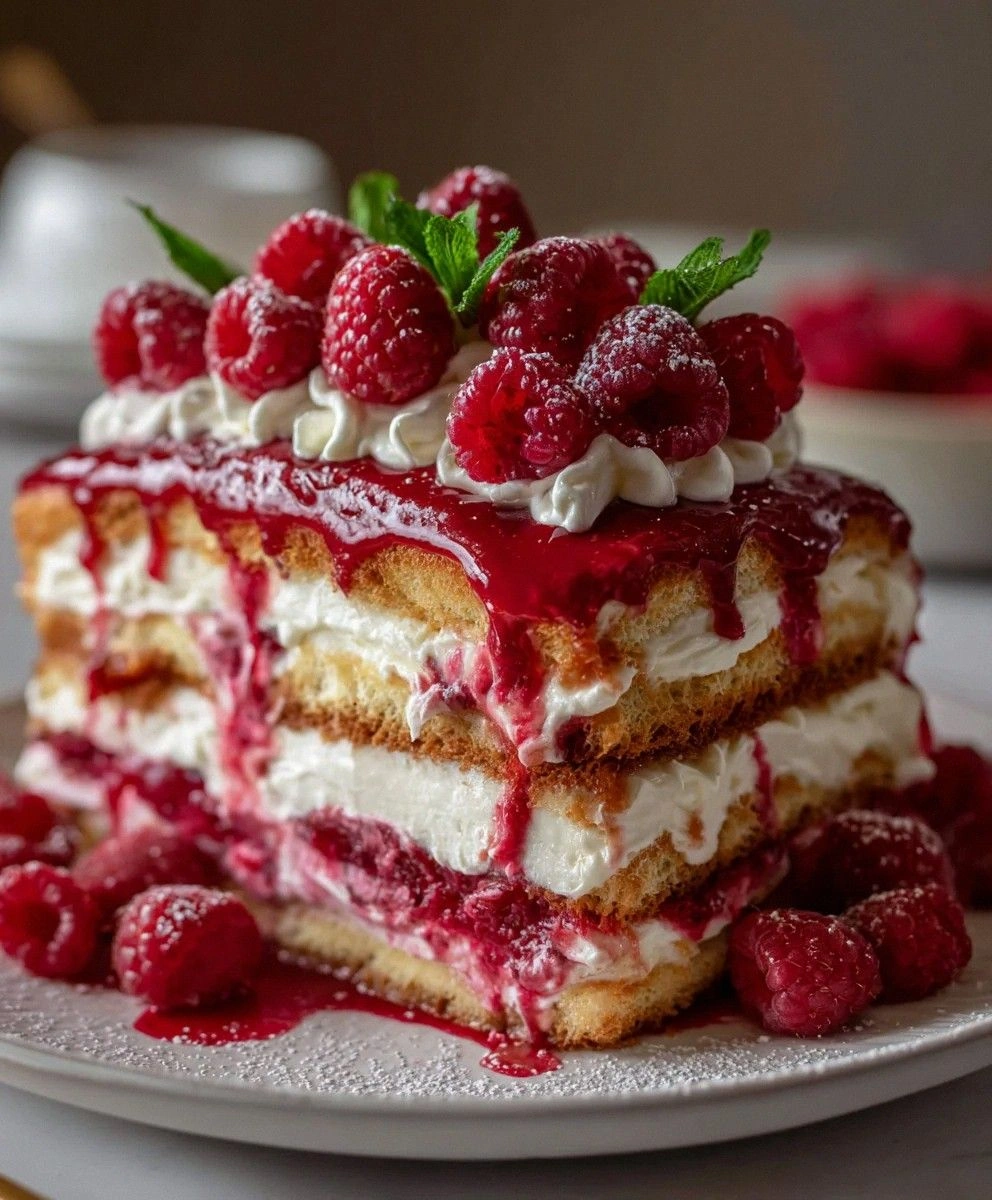
Picture this instead: layers of cloud-like cream cheese and mascarpone whipped into submission, interlaced with ladyfingers that have been kissed by a raspberry syrup so vibrant it practically glows. The tart berries cut through the richness like a perfectly timed punchline, while the whole thing sits in your fridge getting friendlier and more sophisticated by the hour. This isn't just a dessert — it's a revelation wrapped in a springform pan.
I've spent three years perfecting this recipe, testing it on unsuspecting dinner guests, picky children, and one very judgmental neighbor who claims she doesn't like desserts. Every single person has asked for seconds, and yes, I absolutely count that as a personal victory. The secret isn't just in the ingredients (though we'll get to those in excruciating detail), but in the technique that makes each layer sing in perfect harmony.
Okay, ready for the game-changer? We're not just swapping coffee for raspberries and calling it a day. Oh no, my friend. We're creating a raspberry syrup that concentrates those summer berries into pure liquid gold, whipping our cream to exactly the right peak (I'll show you the spoon test that never fails), and building layers that would make a architect weep with joy. Let me walk you through every single step — by the end, you'll wonder how you ever made it any other way.
What Makes This Version Stand Out
- Berry-Forward Brilliance: Most fruit tiramisus taste like someone waved a raspberry over regular tiramisu and called it innovative. Not here. We reduce fresh berries into an intense syrup that permeates every single bite, ensuring the fruit isn't just a garnish but the star of the entire show.
- Texture Paradise: The combination of mascarpone and cream cheese creates a filling that's both stable enough to slice cleanly and cloud-soft enough to melt on your tongue. We're talking about the kind of texture that makes people close their eyes when they take a bite.
- Make-Ahead Magic: This dessert actually improves with age. While your guests are sipping cocktails, this beauty is in your fridge getting better by the minute. Make it tonight, serve it tomorrow, and watch it disappear faster than free samples at Costco.
- No-Bake Wonder: Summer entertaining just got easier. No hot ovens, no sweating over a stove for hours. Just pure, cool assembly that keeps your kitchen (and you) calm and collected.
- Conversation Starter: Everyone expects coffee tiramisu. When you present this magenta marvel, prepare for gasps, questions, and recipe requests. I've seen grown adults argue over the last piece like it was the last lifeboat on the Titanic.
- Seasonal Flexibility: Fresh raspberries in July? Perfect. Frozen berries in February? Even better. This recipe works with whatever nature (or your freezer) provides, making it a year-round showstopper.
- Crowd Psychology: There's something about the color pink in desserts that makes people happy before they even taste it. Add the Italian pedigree of tiramisu and you've got a dessert that sells itself.
- Instagram Gold: Let's be real — we eat with our eyes first. When you slice into those perfect layers revealing the pink-hued cream against golden ladyfingers, even the most jaded food photographers reach for their phones.
Inside the Ingredient List
The Flavor Foundation
Fresh or frozen raspberries aren't just an ingredient here — they're the entire personality of this dessert. When they're in season, I buy pints and pints from the farmers market, but honestly? Frozen berries often work better because they're picked and preserved at peak ripeness. The key is tasting them first. If your berries taste like summer, you're golden. If they taste like disappointment, add an extra tablespoon of sugar to the syrup. I once made this with subpar berries and the whole dessert tasted like regret.
Granulated sugar does more than sweeten — it helps draw out the juices from the raspberries and creates that gorgeous syrup we're after. Don't go reducing the sugar thinking you're being virtuous. Sugar is a preservative here, helping your tiramisu stay fresh longer, and it balances the natural tartness that could otherwise overwhelm the dessert. I've tried with honey and maple syrup, and while they work, they bring their own flavors that compete with our star ingredient.
Fresh lemon juice is the unsung hero that makes raspberries taste more like themselves. It's like turning up the contrast on a photo — suddenly all the flavors are more vivid and defined. Just a splash brightens everything without making it taste like lemonade. Trust me on this one. I once forgot the lemon and the whole dessert tasted flat, like someone had muted the volume on my taste buds.
The Texture Crew
Mascarpone cheese is where we start building our cloud-like filling. This Italian cream cheese is richer and smoother than its American cousin, with a subtle sweetness that plays beautifully with fruit. The trick is getting it to room temperature before you start mixing — cold mascarpone clumps like nobody's business, and once those lumps form, good luck getting them out. I've tried every method under the sun, and patience (plus a gentle hand) is the only thing that works.
Cream cheese might seem redundant when you already have mascarpone, but here's where we get technical. Cream cheese provides structure and a pleasant tang that keeps the dessert from being too one-note. It's like the bass player in a band — you might not notice it specifically, but take it away and everything falls apart. Make sure it's full-fat and brick-style, not the whipped stuff in a tub. We're building architecture here, not making a snack dip.
Heavy whipping cream is what transforms our dense cheese mixture into something ethereal. The fat content matters — go for 36% or higher. Anything less and your peaks will be sad and droopy, and nobody wants sad cream. I learned this the hard way at a dinner party where my "whipped cream" was more like "slightly thickened cream soup." The horror.
The Unexpected Star
Cornstarch is my secret weapon for creating a raspberry puree that actually thickens instead of turning your ladyfingers into a soggy mess. Most recipes skip this step and end up with a pool of pink liquid at the bottom of the pan. Not here. We want our syrup to coat the back of a spoon, to have body and presence, to announce itself when it hits your tongue. Just a teaspoon transforms thin juice into velvet.
Vanilla extract might seem boring, but it's the bridge between our tart berries and rich cheese mixture. It adds warmth and depth, a floral note that makes people say "what is that?" without being able to identify it specifically. Use the good stuff — imitation vanilla tastes like disappointment and childhood birthday parties. The real stuff costs more but you'll use less, and your taste buds will thank you.
The Final Flourish
Ladyfingers are the scaffolding that holds our whole operation together. These sponge cookies are designed to absorb liquid without falling apart, creating that signature tiramisu texture. Don't even think about substituting with regular cookies — they'll turn to mush faster than you can say "what happened?" The key is a quick dip, not a soak. Count "one Mississippi, two Mississippi" as you dip each finger, then out it comes. Any longer and you'll need a spoon instead of a fork.
Fresh raspberries for topping aren't just about looks (though they do make the whole thing Instagram-ready). They provide a burst of fresh flavor that reminds you this isn't some artificial, candy-sweet dessert. Plus, they signal to your guests what they're about to eat. I once served this without the berry garnish and watched people look confused until they took a bite. The berries on top are like a preview of coming attractions.
Mint sprigs are optional, but here's why you should include them: mint and raspberries share flavor compounds that make each other taste better. It's like they're old friends who bring out the best in each other. Plus, that pop of green makes the whole dessert look like it belongs in a magazine. Just don't overdo it — one small sprig per serving is plenty. Too much mint and your dessert tastes like toothpaste.
Everything's prepped? Good. Let's get into the real action...
The Method — Step by Step
- First, we make our raspberry syrup because it needs time to cool and thicken. In a medium saucepan, combine your raspberries, sugar, lemon juice, and water over medium heat. Watch closely as the berries start to release their juice — it happens faster than you'd think. Stir gently with a spatula, coaxing the berries to give up their color and flavor. After about 5 minutes, you'll have a gorgeous magenta pool that smells like summer in a bowl. Now here's the crucial part: strain out the seeds. I know, I know, extra dishes. But seed-filled syrup is like finding sand in your sandwich — technically edible but deeply unpleasant.
- Return the strained juice to the pan and whisk in your cornstarch. This is where magic happens. The cloudy mixture will suddenly transform into a glossy, thick syrup that coats your spoon like velvet. Keep whisking for another minute to cook out the raw cornstarch taste. Remove from heat and let it cool completely. I stick mine in the fridge to speed things up, but don't cheat and use it warm — hot syrup will turn your cream into a curdled mess and nobody wants that kind of drama.
- While your syrup cools, let's tackle the cream mixture. In a large bowl, beat your room-temperature mascarpone and cream cheese until smooth and fluffy. This takes about 2 minutes with an electric mixer, but keep an eye on it. Over-beating makes the cheese grainy and sad. Add your powdered sugar and vanilla, beating just until combined. The mixture should be smooth enough to spread but thick enough to hold peaks. Think clouds, not soup.
- In a separate bowl (I know, more dishes, but trust me), whip your heavy cream to stiff peaks. This is where people mess up. Start on low speed, gradually increasing to medium-high. When the cream starts to thicken, pay attention. You're looking for peaks that stand up proudly but still have a slight curl at the tip. Over-whipped cream turns to butter, and while that might be interesting, it's not what we're after. Fold the whipped cream into your cheese mixture in three additions, using a gentle scoop-and-fold motion. The goal is to maintain all that beautiful air we just incorporated.
- Now comes the fun part — assembly! Choose a 9x13 pan or similar size dish. I've used everything from a trifle bowl to individual glasses, and they all work. The key is having enough surface area for multiple layers. Start with a thin layer of your cream mixture on the bottom — this prevents the ladyfingers from sliding around like drunk dancers. Quick-dip your ladyfingers in the raspberry syrup and arrange them in a single layer. Don't be tempted to double-dip; they'll fall apart faster than my willpower in a bakery.
- Spread half your remaining cream mixture over the ladyfingers, making sure to get into the corners. This isn't the time for perfection — rustic is fine, but gaps will show when you cut slices. Add another layer of syrup-dipped ladyfingers, pressing down gently. You should hear a satisfying squish as they settle into place. Top with the rest of your cream mixture, smoothing the top like you're icing a cake. Some people get fancy with piping bags here, but I like the homemade look of a spatula-swirled top.
- Cover with plastic wrap (not touching the cream) and refrigerate for at least 4 hours, but overnight is where the real magic happens. During this time, the ladyfingers soften to cake-like tenderness, the flavors meld into something greater than their parts, and the whole thing firms up enough to slice cleanly. I once served this after only 2 hours and while it tasted good, it was more like a trifle than tiramisu's signature layered structure. Patience, young grasshopper.
- When ready to serve, top with fresh raspberries and mint sprigs. If you're feeling fancy, dust with powdered sugar through a fine-mesh sieve. The sugar will dissolve into the cream, creating a sweet crust that crackles under your spoon. Cut with a sharp knife dipped in hot water for clean slices. Wipe the knife between cuts for presentation that says "I have my life together" even if you don't.
That's it — you did it. But hold on, I've got a few more tricks that'll take this to another level...
Insider Tricks for Flawless Results
The Temperature Rule Nobody Follows
Room temperature isn't just a suggestion — it's the difference between smooth, silky cream and a lumpy mess that looks like cottage cheese had a bad day. Take your cheeses out of the fridge at least 2 hours before you start. In winter, I set them near (not on) a radiator. In summer, the counter works fine. Cold cream cheese refuses to blend smoothly, and you'll end up beating it so long trying to eliminate lumps that you ruin the texture entirely. I've seen people try to microwave cold cheese and end up with partially melted, partially cold chunks that no amount of mixing will save.
Why Your Nose Knows Best
Don't underestimate the power of smell in cooking. When your raspberry syrup is ready, it should smell like the best berry jam you've ever tasted. If it smells sharp or vegetal, it needs more sugar. If it smells like candy, you've gone too far with the sweetness. Your nose picks up on nuances your tongue misses. That moment when the berries hit the hot pan and release their perfume? That's when you know you're on the right track. I once had a batch that smelled like berry-scented candles instead of actual berries — turns out the berries were past their prime.
The 5-Minute Rest That Changes Everything
After you fold in your whipped cream, let the mixture rest for exactly 5 minutes. This allows the gelatin in the cream cheese to start setting, creates a more stable mixture, and prevents the cream from deflating as you assemble. It's like letting a good steak rest after cooking — the difference is subtle but noticeable. During this time, the flavors also have a chance to meld. Taste it after the rest and you'll notice the vanilla is more pronounced, the sweetness better balanced, the whole thing more harmonious. Skip this step and your tiramisu might weep liquid after a day in the fridge.
The Ladyfinger Soaking Secret
Here's what nobody tells you: the temperature of your syrup matters almost as much as the timing. Warm syrup soaks in faster, cold syrup gives you more control. I like my syrup at room temperature — warm enough to be fluid, cool enough not to melt the cream. And don't just dunk and remove. Count to three, letting the ladyfinger absorb liquid, but pull it out before it becomes too soft to handle. They'll continue softening as the tiramisu sets. Over-soaked ladyfingers create a dense, soggy layer that ruins the whole texture balance we're after.
The Overnight Transformation
If you think this dessert is good after 4 hours, wait until you taste it after 24. Something magical happens overnight. The flavors deepen and round out, the texture becomes more cohesive, and the whole thing transforms from good to transcendent. The raspberry syrup migrates slightly into the cream layers, creating these beautiful pink swirls. The ladyfingers achieve that perfect cake-like consistency. I dare you to make two batches — one for tonight, one for tomorrow — and compare them. The overnight version wins every single time, hands down, no contest.
Creative Twists and Variations
This recipe is a playground. Here are some of my favorite ways to switch things up:
Triple Berry Bomb
Replace half the raspberries with equal parts blackberries and blueberries for a more complex berry flavor. The blackberries add wine-like depth, blueberries bring sweetness, and raspberries provide the tart backbone. Use mixed berry jam in place of some sugar for an even more intense fruit flavor. Top with a mix of all three berries for a dessert that looks like a jeweled crown. Your guests will think you spent hours on something that still takes under 30 minutes of active time.
Peach Raspberry Summer
During peach season, add a layer of thinly sliced fresh peaches between the ladyfingers. The combination of peach and raspberry is like sunshine and laughter in dessert form. Poach the peaches briefly in white wine with vanilla for an adult version that pairs beautifully with the berry flavors. Reduce the raspberry syrup slightly more since the peaches will add extra moisture. This version tastes like vacation on a fork.
Chocolate Raspberry Decadence
Add 2 tablespoons of cocoa powder to your cream mixture and layer with chocolate ladyfingers instead of plain. The chocolate-raspberry combination is classic for a reason — the cocoa's bitterness balances the berry sweetness perfectly. Drizzle with chocolate ganache before serving for extra indulgence. This version is richer, more sophisticated, and perfect for chocolate lovers who think fruit desserts aren't decadent enough.
Lemon Raspberry Dream
Add the zest of one lemon to your cream mixture and replace the vanilla with lemon extract. The citrus notes amplify the raspberry flavor while adding brightness that makes this perfect for spring brunches. Top with candied lemon peel for texture and visual appeal. The lemon-raspberry combination tastes like the first warm day after winter — fresh, bright, and completely uplifting.
Almond Raspberry Elegance
Replace the vanilla with almond extract (use half the amount — it's strong stuff) and add a layer of thinly sliced almonds between the cream layers for crunch. The almond-raspberry pairing is sophisticated and slightly European-tasting. Toast the almonds first for deeper flavor. This version feels fancy enough for a wedding shower but easy enough for a Tuesday.
Mini Individual Trifles
Instead of one large pan, layer everything in small glasses or jars for individual servings. These are perfect for parties where people are mingling — no cutting, no plates, just grab and go. Plus, everyone gets their own perfect portion. Kids love having their own personal dessert, and adults appreciate not having to share. Layer them in clear containers to show off those beautiful stripes.
Storing and Bringing It Back to Life
Fridge Storage
This tiramisu keeps beautifully in the fridge for up to 4 days, though it's at its absolute best within the first 48 hours. Cover tightly with plastic wrap, pressing it directly onto the surface to prevent a skin from forming. The flavors continue to develop and meld, becoming more complex over time. After day 3, the ladyfingers start to break down more, creating a softer, more homogenous texture that's still delicious but different from the distinct layers you get initially. I've served this to guests on day 4 and they still raved, so don't feel like you have to toss leftovers.
Freezer Friendly
Here's a game-changer: this tiramisu freezes beautifully for up to 2 months. Wrap individual portions tightly in plastic wrap, then foil, and freeze. Thaw overnight in the refrigerator. The texture changes slightly — it becomes more ice cream-like, which honestly isn't a bad thing. The raspberry syrup might separate slightly after thawing, but a quick stir before serving fixes everything. Having individual frozen portions means you're always 30 minutes away from an impressive dessert. I've pulled these out for unexpected guests and watched them think I'm some kind of domestic wizard.
Best Reheating Method
Good news — there's no reheating required! This is meant to be served cold, straight from the fridge. In fact, warming it would melt the cream and turn your beautiful layers into a sad, soupy mess. If you've frozen portions, let them thaw in the fridge overnight. For a slightly softer texture, let it sit at room temperature for 10-15 minutes before serving. If the top looks dry after storage, add a few fresh berries or a light dusting of powdered sugar to freshen it up. And here's a pro tip: a slightly chilled fork cuts through the layers more cleanly than a warm one.