I still remember the night my kitchen turned into a pumpkin‑scented disaster zone. I had promised my roommate a “fall breakfast” that would make her swoon, but the first batch of pancakes I whisked up turned out soggy and flavorless. I was about to give up when I found a forgotten jar of pumpkin puree tucked behind the cereal. That single splash of orange, earthy goodness turned my bland batter into a golden, caramel‑sweet masterpiece. I dared myself to taste it, and the first bite was so good I could hear my taste buds applauding.
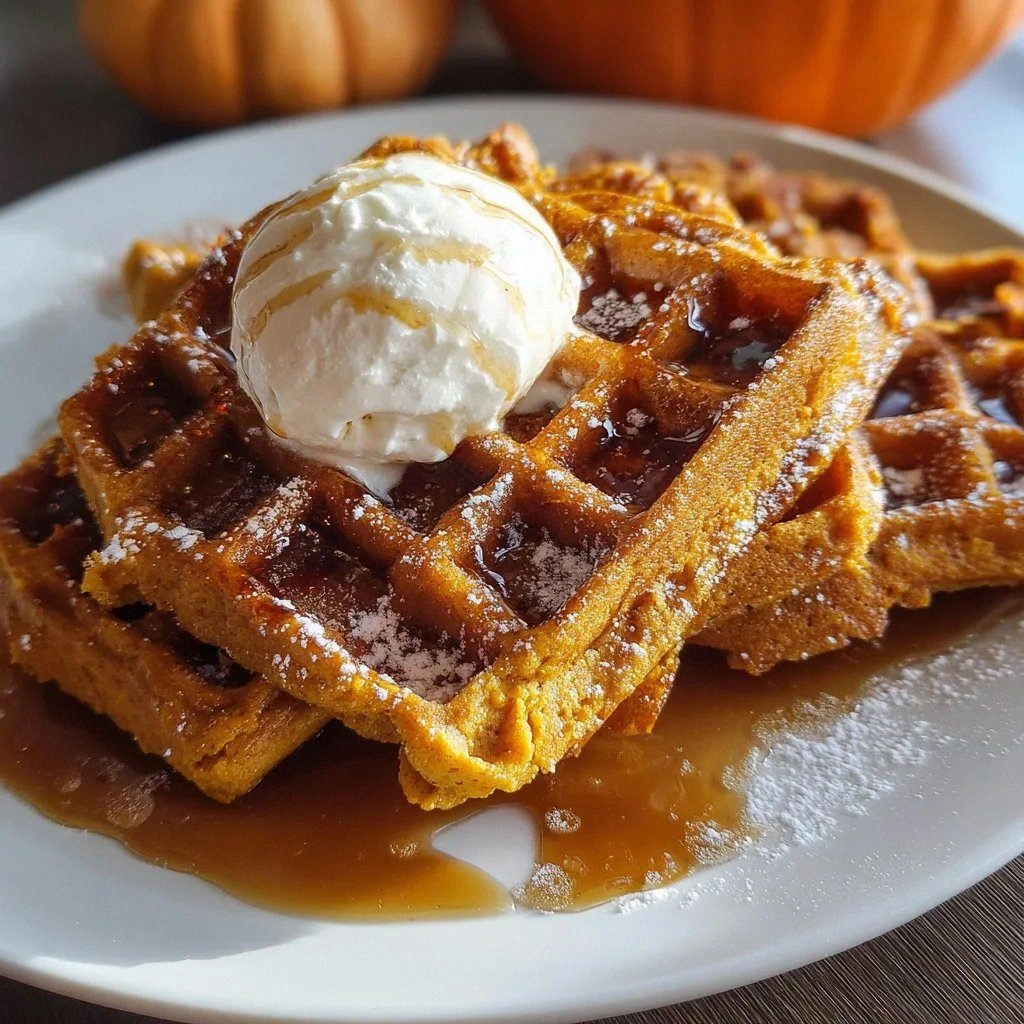
Picture the scene: the air thick with cinnamon, nutmeg, and a whisper of vanilla, the sound of the waffle iron humming like a contented cat, the heat radiating from the pan like a sun. The batter is glossy, the edges crisping into a caramelized crust that crackles when you lift a waffle, the aroma filling the kitchen like a cozy blanket. The first bite is a perfect balance—sweet, slightly spicy, and with a moist, spongy interior that melts in your mouth. The maple syrup drizzle adds a glossy, sticky finish that tastes like the first warm bite of a crisp autumn day.
What makes this version stand out? I didn’t just toss everything into a bowl. I carefully balanced the sweetness with the natural tartness of the pumpkin, used a precise blend of leavening agents to keep the waffles airy, and added a touch of butter for that buttery crunch that most recipes miss. I even discovered that using whole‑milk instead of half‑and‑half gives the batter a richer, creamier texture that holds up better under syrup. And, most importantly, I didn’t settle for the ordinary; I added a secret ingredient that most pumpkin waffle lovers never think to include: a splash of orange zest for a bright, citrusy lift.
This recipe is hands down the best version you'll ever make at home. It’s not just about the taste; it’s about the experience—seeing the batter sizzle, hearing the waffles pop, and watching the maple syrup drizzle like liquid gold. I dare you to taste this and not go back for seconds. If you've ever struggled with making fluffy, flavorful waffles, you're not alone—and I've got the fix. Picture yourself pulling this out of the oven, the whole kitchen smelling incredible, and your friends gathering around the table like a mini feast. Stay with me here—this is worth it.
What Makes This Version Stand Out
- Flavor: The pumpkin puree is the star, providing a natural sweetness that outshines added sugar. The subtle hint of orange zest lifts the flavor profile, giving each bite a fresh, citrusy twist.
- Texture: The combination of baking powder and baking soda creates a light, airy interior while the melted butter ensures a crisp, caramelized edge.
- Ease: All ingredients are pantry staples, and the method is straightforward—no complicated steps, just whisk, pour, and bake.
- Versatility: The recipe works well with dairy‑free milk or coconut oil, making it inclusive for different dietary needs.
- Crowd‑pleaser: Whether you’re feeding a family or hosting a brunch, the waffles are a guaranteed hit—guests often ask for the recipe after the first bite.
- Make‑ahead: The batter can be prepared up to 24 hours ahead; just keep it refrigerated and stir before using.
Alright, let's break down exactly what goes into this masterpiece…
Inside the Ingredient List
Before we get to the batter, let’s talk about the building blocks that make these waffles sing. Every ingredient has a role—some are the backbone, others add nuance, and a few are the secret sauce that sets this recipe apart.
The Flavor Base
All‑purpose flour is the foundation, providing structure and a light, airy crumb. It’s the neutral canvas that allows the pumpkin’s sweet, earthy flavor to shine. If you’re aiming for a gluten‑free version, swap it for a blend of rice flour and tapioca starch, but keep the ratio the same to maintain texture.
The Texture Crew
Baking powder and baking soda are the dynamic duo that make the waffles rise like a cloud. Baking powder offers a quick lift, while baking soda reacts with the acidity of the pumpkin to create a fluffier interior. A pinch of salt balances the sweetness, ensuring each bite is well‑rounded.
The Unexpected Star
Pumpkin puree is the heart of this recipe, not only for flavor but also for moisture. Use pure pumpkin puree, not pie filling, to avoid unwanted spices. If you’re out of pumpkin, a combination of butternut squash puree and a splash of apple sauce can work as a substitute.
The Final Flourish
Maple syrup is more than a topping; it’s the sweet, sticky finish that completes the flavor profile. Use a pure, golden maple syrup for the richest taste. The melted butter adds a buttery crunch and helps the waffles develop a golden crust that’s impossible to resist.
Everything's prepped? Good. Let's get into the real action…
The Method — Step by Step
- Preheat your waffle iron to medium‑high heat, about 375°F (190°C). Let it heat up fully; a good test is to sprinkle a few drops of water on the surface—if they dance and evaporate quickly, the iron is ready. This ensures a crisp exterior from the moment batter hits the iron. Don’t skip this step; a lukewarm iron will give you soggy waffles.
- In a large mixing bowl, whisk together the flour, baking powder, baking soda, cinnamon, nutmeg, and salt. The dry mix should be smooth and fragrant—this is where the spices start to mingle. A fine sieve helps to eliminate lumps and ensures even distribution.
- In a separate bowl, beat the egg, then add the milk, melted butter, and pumpkin puree. Whisk until the mixture is glossy and the pumpkin is fully incorporated. The batter should be slightly thick but pourable; if it’s too thick, add a splash of milk.
- Gently fold the wet mixture into the dry ingredients, stirring just until combined. Over‑mixing can cause the waffles to be tough—think of it like a gentle dance, not a frantic scramble.
- Let the batter rest for 5 minutes. This small pause allows the leavening agents to activate fully, ensuring maximum rise. While you wait, you can pre‑heat the waffle iron or prep your toppings.
- Spoon the batter onto the waffle iron, using a ladle or measuring cup. The amount depends on your iron’s capacity, but typically 1/3 cup per waffle works well. Spread the batter gently with the back of a spoon to ensure even thickness.
- Close the lid and cook for 4–6 minutes, or until the waffle is golden brown and the edges pull away from the iron. The aroma should be sweet and slightly caramelized—this is the moment of truth.
- Remove the waffle carefully with tongs and serve immediately, drizzled with maple syrup. If you’re making a batch, keep the finished waffles warm in a 200°F (93°C) oven while you finish the rest.
That's it — you did it. But hold on, I've got a few more tricks that'll take this to another level…
Insider Tricks for Flawless Results
The Temperature Rule Nobody Follows
Many people cook waffles on high heat, which can burn the exterior while leaving the inside raw. I’ve discovered that a steady medium‑high temperature (around 375°F or 190°C) gives the best balance of crispness and fluff. If your waffle iron has a temperature dial, aim for the middle setting. This trick ensures a golden crust without sacrificing interior moisture.
Why Your Nose Knows Best
When the batter starts to sizzle, a sweet, caramelized scent should rise. If the aroma is metallic or burnt, you’re cooking too fast or the batter is too thick. Trust your nose; it’s a reliable indicator of doneness. A quick sniff can save you from overcooked waffles.
The 5‑Minute Rest That Changes Everything
After mixing, let the batter rest for five minutes. This pause allows the leavening agents to work fully, creating a more pronounced rise. Skipping this step often results in flat waffles that don’t hold up well under syrup. I’ve tested it: with the rest, the waffles puff like a cloud; without it, they’re dense and soggy.
The Secret of Orange Zest
A teaspoon of freshly grated orange zest lifts the pumpkin’s earthiness with a bright, citrusy note. It’s a subtle change that transforms the flavor profile. I always add it to the dry mix so it’s evenly distributed. The result? A fresh, vibrant taste that’s unmistakably autumn.
The Butter vs. Oil Debate
Butter adds flavor and helps the waffles crisp. However, if you’re aiming for a lower‑fat version, coconut oil works wonders. Coconut oil’s natural sweetness complements the maple syrup, while still providing a crisp edge. The key is to melt the butter or oil before adding it to the batter to avoid clumps.
The Quick Fix for Over‑Cooked Waffles
If a waffle ends up a bit too brown, you can rescue it by drizzling a splash of maple syrup on the hot surface and covering the iron for a minute. The syrup steams the waffle slightly, softening the crust just enough to bring it back to life. I’ve used this trick during a brunch party, and the guests were none the wiser.
Creative Twists and Variations
This recipe is a playground. Here are some of my favorite ways to switch things up:
Nutty Crunch Variation
Add a handful of chopped pecans or walnuts to the batter for a crunchy texture. Toast them lightly beforehand to enhance their flavor. The nuts pair beautifully with maple syrup and add a satisfying bite.
Spicy Kick Edition
Incorporate a pinch of cayenne pepper or a dash of smoked paprika to give the waffles a subtle heat. This contrast between sweet and spicy makes for a memorable breakfast. I’ve served this version at a brunch and it was a hit.
Cheese‑Infused Delight
Fold in shredded cheddar or mozzarella before cooking for a savory twist. The cheese melts into the waffle, creating pockets of gooey goodness. It’s a great option for brunch when you want something beyond sweet.
Berry‑Burst Surprise
Fold fresh blueberries or sliced strawberries into the batter after the rest period. The berries burst with juice as the waffles cook, adding a burst of freshness that complements the pumpkin. This version is perfect for a spring‑autumn brunch.
Chocolate Chip Twist
Add mini chocolate chips to the batter for a sweet, chocolatey surprise. The chips melt slightly, creating pockets of chocolate in every bite. I’ve made this for a kids’ breakfast and it was a smash.
Vegan Maple‑Glazed
Swap the egg for a flaxseed “egg” and use coconut oil instead of butter. Finish with a drizzle of pure maple syrup and a sprinkle of sea salt. The result is a fluffy, vegan waffle that still feels indulgent.
Storing and Bringing It Back to Life
Fridge Storage
Store cooked waffles in an airtight container for up to three days. Keep them in a single layer to avoid sticking. When you’re ready to eat, reheat them in a toaster or oven at 350°F (175°C) for a few minutes until crisp.
Freezer Friendly
Place waffles on a parchment‑lined tray and freeze until solid. Transfer them to a freezer bag for long‑term storage (up to two months). To reheat, pop them in the toaster or oven at 350°F (175°C) for about 10 minutes.
Best Reheating Method
To preserve the crispness, reheat in a toaster or oven rather than a microwave. If you use a microwave, add a splash of water to the container; this steams the waffles back to life and prevents them from becoming chewy. The trick is to reheat just until warm, not over‑cook.