Let me tell you about the time I nearly set my kitchen on fire trying to recreate that addictive Peruvian chicken from the food truck down the street. There I was, smoke billowing from my grill pan, chicken charred beyond recognition, and my neighbors pounding on the door because they thought I'd finally done something truly dangerous in my quest for the perfect pollo a la brasa. But here's the thing — that disaster led me to something even better. After three months of obsessive testing, midnight marinades, and one very patient Peruvian grandmother I cornered at a dinner party, I've cracked the code on what might be the most crave-worthy chicken recipe you'll ever master.
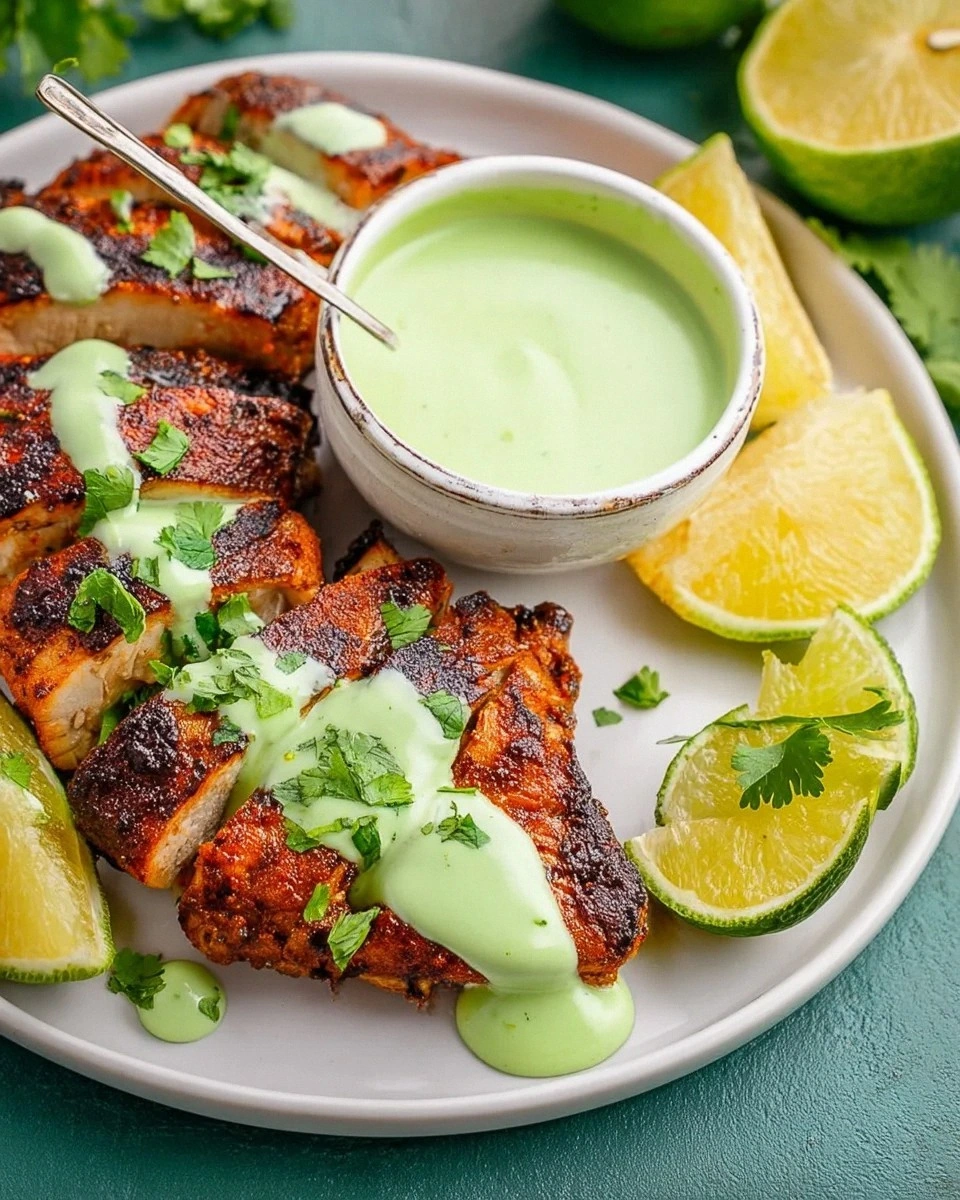
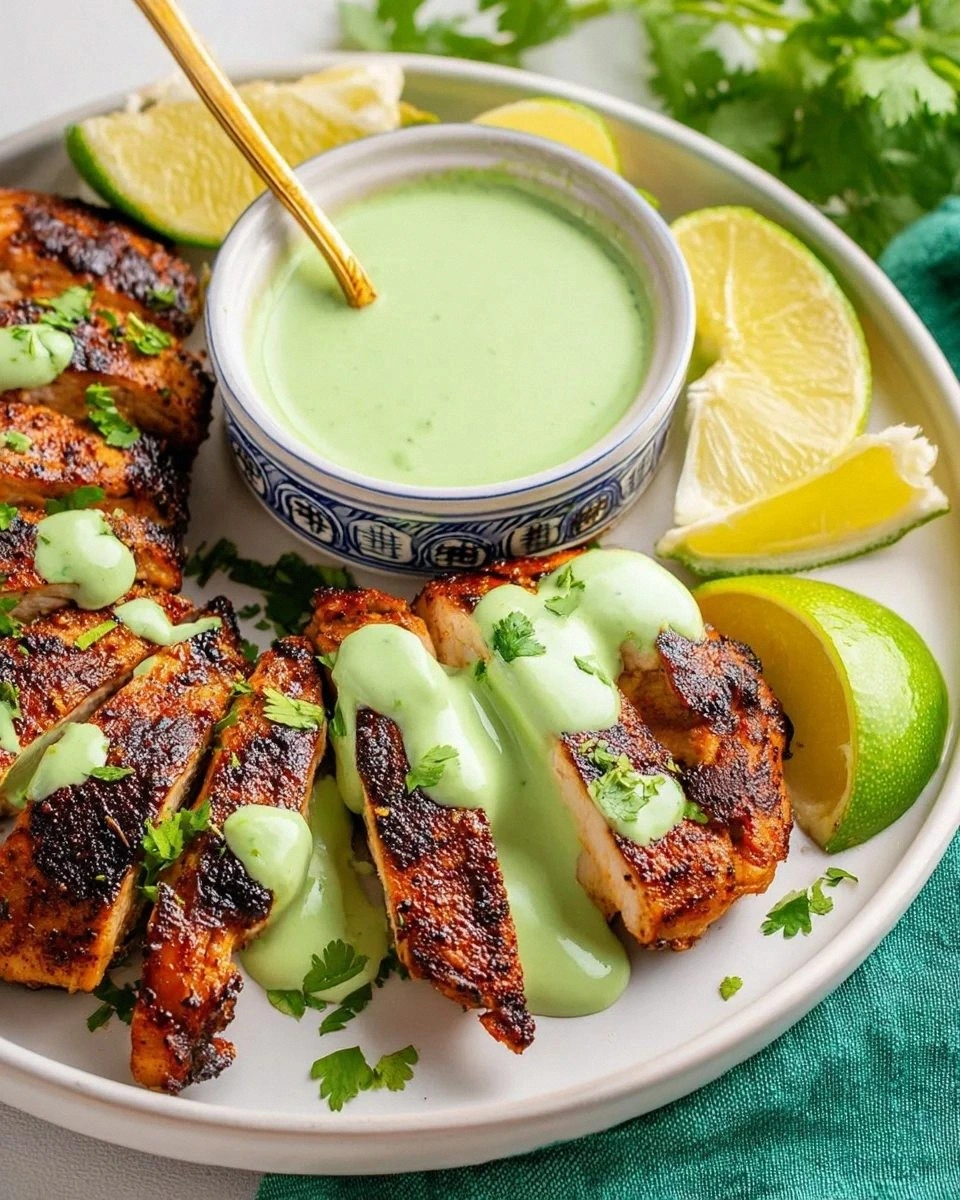
Picture this: tender chicken that's been bathing in a secret marinade that includes soy sauce (yes, really), beer (trust me), and a symphony of spices that makes your kitchen smell like a street market in Lima. The outside gets these gorgeous charred edges that crackle when you bite into them, while the inside stays so juicy it practically sings. But the real magic? That creamy green sauce that you'll want to pour over everything from fries to your morning eggs. I once caught my roommate drinking it straight from the blender — and honestly, I couldn't even be mad because I'd done the same thing the week before.
Most recipes you'll find online completely miss the mark on what makes Peruvian chicken truly special. They skip the beer in the marinade (a rookie mistake), use the wrong chilies for the sauce, or worse — they tell you to bake it instead of grilling. Listen, I love a good sheet pan dinner as much as the next person, but this isn't the time for shortcuts. When you get this right, you're not just making dinner; you're creating an experience that'll have people texting you for the recipe at 2 AM because they can't stop thinking about it.
The technique I'm about to share isn't just another grilled chicken recipe — it's the accumulation of dozens of trials, one very memorable dinner party where I served six different versions (my friends still talk about "The Great Chicken Experiment of 2023"), and enough research to write a thesis on South American street food. By the time we're done here, you'll understand why certain ingredients work together, how to achieve that restaurant-quality char at home, and yes, how to make that sauce that'll change your life. Ready to dive into the most flavor-packed adventure your grill has ever seen?
What Makes This Version Stand Out
Flavor Bomb Marinade: Most recipes use a basic spice rub and call it a day. This version uses a 24-hour soak in a mixture that includes dark beer, soy sauce, and aji amarillo paste that penetrates every fiber of the meat. The result? Chicken that tastes incredible even before you add the sauce.
Restaurant-Quality Char: The secret lies in starting the chicken skin-side down over high heat to render the fat, then moving it to indirect heat to finish cooking. This creates those Instagram-worthy grill marks while keeping the meat impossibly juicy. That first bite through the crispy exterior into the tender meat? Pure textural perfection.
The Sauce That Steals the Show: While everyone's focused on the chicken, the real star is that creamy green sauce made with aji amarillo peppers, queso fresco, and evaporated milk. It's got this haunting heat that builds slowly, cooling creaminess that coats your tongue, and bright citrus notes that make you want to lick the plate clean.
Weekend Project, Weeknight Speed: Yes, it needs an overnight marinade, but the actual cooking time is under 30 minutes. I make the marinade on Sunday, let it work its magic while I'm at work Monday, and come home to a dinner that tastes like I spent hours slaving away.
Leftovers That Improve: Here's the wild part — this chicken actually gets better overnight. The flavors meld and deepen, making tomorrow's lunch something to genuinely look forward to. I always make extra just so I can shred it over salads or stuff it into sandwiches throughout the week.
Authentic But Approachable: Traditional recipes require hard-to-find ingredients like fresh huacatay (black mint) or specific charcoal types. This version uses accessible ingredients while maintaining that authentic flavor profile that'll transport you straight to a Lima street corner.
Crowd-Pleasing Magic: I've served this to picky kids, spice-averse relatives, and food snob friends, and watched them all go back for thirds. It's got that perfect balance of familiar flavors with enough exotic flair to keep things interesting.
Inside the Ingredient List
The Flavor Base
Let's talk about the marinade, because this is where the magic begins. The soy sauce might seem out of place in a Peruvian recipe, but it's actually a nod to the large Japanese influence in Peruvian cuisine. It adds this incredible umami depth that you can't achieve with salt alone. The beer isn't just for fun — the enzymes help tenderize the meat while adding a malty sweetness that balances the heat from the peppers. I've tested this with everything from cheap lager to craft IPA, and honestly, a basic pilsner works best. Save your expensive beer for drinking.
The aji amarillo paste is non-negotiable here. These yellow Peruvian peppers have this unique fruity heat that's mild enough to let you taste the other flavors but present enough to remind you you're eating something special. You can find it in Latin American markets or online, and one jar will make this recipe at least six times. If you absolutely can't find it, a mix of yellow bell pepper and habanero will get you close, but it won't have that same haunting complexity.
Garlic plays a starring role in both the marinade and the sauce, and I'm not talking about a polite amount. We're using eight cloves total because Peruvian cuisine isn't shy about garlic. Fresh garlic is essential here — the pre-minced stuff in jars has lost its punch and will leave your sauce tasting flat. Trust me, I've tried to cheat with the jarred stuff, and the results were so disappointing that I ended up ordering takeout that night.
The Texture Crew
The chicken itself needs to be bone-in, skin-on thighs. I know, I know — everyone wants to use chicken breasts because they're "healthier," but thigh meat has more flavor, stays juicier, and has enough fat to prevent it from drying out on the grill. The skin acts like a built-in basting system, rendering down and keeping the meat moist while adding incredible flavor. If you're one of those people who removes chicken skin, I'm going to pretend I didn't hear that.
For the sauce, we're using queso fresco as our base, which gives us that authentic Latin American tang. It's a fresh, mild cheese that crumbles easily and melts smoothly into the sauce. Don't substitute with feta — it's too salty and assertive. Farmer's cheese or even ricotta will work in a pinch, but if you can find queso fresco, it makes a difference. The texture should be creamy but not heavy, coating the back of a spoon but not turning into cheese soup.
Evaporated milk might seem like an odd choice, but it's actually brilliant. Unlike regular milk, it won't curdle when blended with acidic ingredients like lime juice and vinegar. It gives the sauce this luxurious body that you can't achieve with regular milk or cream. Plus, it has this subtle caramelized note from the evaporation process that adds another layer of complexity to the sauce.
The Unexpected Star
Here's where things get interesting — we're adding saltine crackers to the sauce. Yes, the same crackers your grandma serves with soup. They act as a thickener and give the sauce this silky body that cornstarch or flour just can't replicate. The crackers dissolve completely, leaving behind just their starchy goodness. It's a trick I learned from that Peruvian grandmother, and it's absolutely genius. Don't even think about skipping this or substituting with breadcrumbs — they have the wrong texture and flavor.
The lime juice gets added at the very end of making the sauce because citrus can make dairy curdle if it sits too long. Fresh lime juice is essential — the bottled stuff has this bitter, metallic edge that will ruin all your hard work. Same goes for the vinegar in the marinade. It needs to be white vinegar, not apple cider or balsamic. We're not making salad dressing here.
Cilantro haters, I see you and I'm sorry, but this sauce needs the fresh herbs. The cilantro adds this bright, grassy note that cuts through the richness of the sauce. If you're genetically predisposed to think cilantro tastes like soap (I know it's a real thing), you could substitute with flat-leaf parsley, but it won't have quite the same effect. The sauce needs that green freshness to balance all the creamy, spicy elements.
The Final Flourish
The finishing touches make all the difference between good and unforgettable. A drizzle of good olive oil right before serving adds this luxurious mouthfeel and helps carry all the flavors. The final squeeze of lime wakes everything up and adds that bright note that makes you want to keep eating. Even if you think you've added enough salt, taste it one more time before serving — the difference between properly seasoned and under-seasoned is the difference between a good meal and a great one.
Everything's prepped? Good. Let's get into the real action...

The Method — Step by Step
- Start your marinade the night before by combining the beer, soy sauce, vinegar, garlic, aji amarillo paste, cumin, paprika, oregano, and black pepper in a large bowl. Whisk it all together until the paste dissolves completely and you've got this gorgeous rusty-colored liquid that smells like Peru in a bowl. Add your chicken thighs, making sure each piece is completely submerged. Cover with plastic wrap and refrigerate at least 8 hours, but 24 hours is where the real magic happens. I always do this on Sunday evening so Monday's dinner is basically ready to go.
- When you're ready to cook, take the chicken out of the fridge 30 minutes before it hits the grill — cold meat won't cook evenly, and we're not about to ruin all our hard work with uneven cooking. While the chicken comes to room temperature, make your sauce by combining the queso fresco, evaporated milk, crackers, garlic, aji amarillo paste, cilantro, and lime juice in a blender. Blend on high for a full minute until it's completely smooth and creamy. The sauce should be the color of spring grass and thick enough to coat the back of a spoon. Taste it — it should be creamy, slightly spicy, and bright from the lime. Add salt gradually, tasting as you go.
- Preheat your grill to medium-high heat — you should be able to hold your hand about 5 inches above the grates for 3-4 seconds before it gets too hot. Clean the grates with a wire brush because old burnt bits will make your beautiful chicken taste like last week's barbecue. Oil the grates by dipping a paper towel in vegetable oil and rubbing it across the bars with tongs. This prevents sticking and creates those beautiful grill marks that'll make your Instagram followers weep with envy.
- Remove the chicken from the marinade, letting excess drip off but don't shake it too vigorously — you want some of that flavor-packed liquid clinging to the meat. Discard the marinade because it had raw chicken in it, and we're not trying to give anyone food poisoning. Pat the chicken skin dry with paper towels — this is crucial for crispy skin. Dry skin equals crispy skin, and soggy chicken skin is a crime against humanity.
- Place the chicken skin-side down on the hottest part of the grill and don't touch it for 6-7 minutes. I know it's tempting to peek, but moving it around prevents those gorgeous grill marks from forming. You should hear a satisfying sizzle when it hits the grates — that's the sound of flavor being created. After 6 minutes, lift a corner with tongs to check the color. You're looking for deep golden brown with some charred spots, not blackened cinders.
- When the skin releases easily from the grates (if it's sticking, it's not ready), flip the chicken and move it to the cooler part of the grill. Close the lid and let it cook for another 15-20 minutes, depending on the size of your thighs. The internal temperature should reach 175°F — yes, thighs can handle higher temperatures than breasts without drying out. During this time, the smoke from the grill is infusing the meat with incredible flavor while the indirect heat cooks it through without burning the outside.
- While the chicken finishes cooking, warm your serving platter in a 200°F oven. This keeps everything at the perfect temperature and prevents the chicken from going from hot to lukewarm in seconds. When the chicken hits temperature, transfer it to the warm platter and let it rest for 5 minutes. This allows the juices to redistribute throughout the meat instead of running all over your cutting board when you slice into it. Plus, it gives you time to finish any last-minute preparations.
- Right before serving, give your sauce a good stir and taste it one more time. The flavors should have melded beautifully while you were grilling. If it needs brightening, add a squeeze of lime. If it needs more heat, blend in a small piece of jalapeño. Serve it in a beautiful bowl with a spoon because people are going to want to drown their chicken in this liquid gold. Don't be surprised if they skip the chicken altogether and just start dipping bread directly into the sauce.
- Arrange the chicken on your warmed platter, drizzle with a little olive oil, and sprinkle with fresh cilantro for color. Serve immediately with the sauce on the side or poured over the top — I prefer on the side so people can control their own sauciness level. Watch as your dinner companions take their first bite and their eyes go wide with recognition. That moment when they realize this isn't just another grilled chicken recipe? That's why we do this. That look of pure joy and surprise is worth every minute of effort.
That's it — you did it. But hold on, I've got a few more tricks that'll take this to another level...
Insider Tricks for Flawless Results
The Temperature Rule Nobody Follows
Here's the thing about grilling chicken that nobody tells you: room temperature meat cooks more evenly than cold meat straight from the fridge. When meat is cold, the outside overcooks while the inside struggles to reach a safe temperature. Taking your chicken out 30-45 minutes before grilling isn't just food safety paranoia — it's the difference between juicy, perfectly cooked meat and the dry, stringy stuff that gives grilled chicken a bad name. If you're short on time, even 15 minutes out of the fridge is better than nothing. And please, for the love of all things delicious, don't rinse your chicken before cooking. You're not removing bacteria — you're just spreading it around your kitchen like a tiny salmonella sprinkler system.
Why Your Nose Knows Best
Trust your sense of smell when making this recipe. When the garlic hits the hot oil in the marinade, it should smell toasty and fragrant, not bitter and burnt. If it starts to smell sharp or acrid, your heat is too high and you've moved from flavor development to flavor destruction. Same goes for the sauce — when you blend the aji amarillo with the garlic and cilantro, it should smell bright and alive, like a garden in summer. If it smells flat or dull, your ingredients aren't fresh, and no amount of additional seasoning will save it. That smell test applies to the chicken too — when it's properly marinated, it should smell complex and intriguing, not just like raw chicken with some stuff on it.
The 5-Minute Rest That Changes Everything
I know you're hungry and everything smells incredible, but those 5 minutes of resting time aren't optional — they're essential. When meat cooks, the juices are driven toward the center by heat. If you cut into it immediately, those juices run all over your cutting board, leaving you with dry meat and a messy plate. During the rest, the juices redistribute throughout the meat, ensuring every bite is as juicy as the first. Cover loosely with foil to keep it warm, but don't wrap it tight or you'll steam that beautiful crispy skin you worked so hard for. Use this time to finish your sauce, warm your plates, or pour yourself a well-deserved drink. Your patience will be rewarded with the juiciest chicken of your life.
The Salt Timing That Makes or Breaks It
Here's a confession: I used to salt my chicken right before it hit the grill and wondered why it tasted bland. The secret is salting the marinade properly and then tasting the sauce at the very end. Salt draws out moisture initially, but given time, it breaks down proteins and actually helps the meat retain juices. Salt your marinade generously — you're not eating it straight, it's just flavoring the meat. But with the sauce, add salt gradually at the end because the queso fresco is already salty. Taste, adjust, taste again. And remember that cold dulls flavors, so your sauce might need a touch more salt when it's cold versus when it's at room temperature.
The Blender Trick That Changes Texture
When making the sauce, start your blender on low and gradually increase to high. This prevents the mixture from splattering up the sides and leaving chunks of unblended ingredients. But here's the real secret: once it's smooth, let it run for a full 30 seconds longer than you think necessary. This extra time breaks down the cell walls of the cilantro and peppers, releasing more flavor and creating that silky texture that coats your tongue like velvet. If you have a high-speed blender like a Vitamix, you can skip the crackers entirely and just let it run until it naturally thickens. The friction from the blades will heat it slightly, creating an emulsion that won't separate.
Creative Twists and Variations
This recipe is a playground. Here are some of my favorite ways to switch things up:
Spicy Mango Madness
Add one ripe mango to the sauce ingredients before blending — it adds this gorgeous tropical sweetness that plays beautifully with the heat from the peppers. The mango also thickens the sauce naturally, so you might need fewer crackers. This version is especially good in summer when you want something that tastes like vacation on a plate. Serve it with coconut rice and grilled pineapple for a full tropical experience that'll make you forget you're not on a beach somewhere.
Smoky Chipotle Swap
Replace the aji amarillo paste with chipotle peppers in adobo sauce for a Mexican twist that'll have you dreaming of Oaxaca. The smoky heat is completely different but equally addictive. Add a teaspoon of the adobo sauce for extra depth and serve with warm tortillas instead of rice. Top with pickled red onions and crumbled cotija cheese for a fusion that somehow works perfectly despite breaking all the traditional rules.
Green Goddess Gone Wild
Add a handful of fresh basil and tarragon to the sauce along with the cilantro for a French-Peruvian fusion that'll make you feel like you're dining at a fancy restaurant. The herbs add complexity and make the sauce even more verdant. This version is incredible with grilled vegetables or as a dip for crudités. It's like your favorite green goddess dressing went on vacation to Peru and came back with stories and a new wardrobe.
Coconut Cream Dream
Substitute half the evaporated milk with full-fat coconut milk for a richer, more tropical version that tastes like summer in Rio. The coconut adds natural sweetness and makes the sauce even creamier. This variation is especially good with seafood — try it with grilled shrimp or fish tacos. The coconut and aji amarillo combination is unexpected but absolutely magical, like they were always meant to be together.
Roasted Red Pepper Remix
Replace the aji amarillo with roasted red peppers and add a chipotle pepper for heat. The result is a smoky, slightly sweet sauce that's more accessible for those who find the original too spicy. This version has converted even the most skeptical eaters in my life. The roasted peppers add depth without overwhelming heat, making it perfect for kids or spice-averse guests. Plus, the color is absolutely stunning.
Avocado Everything
Add half a ripe avocado to the sauce for an even creamier version that's practically a meal in itself. The avocado adds healthy fats and makes the sauce thick enough to use as a spread for sandwiches or burgers. This version doesn't keep as long because of the avocado, but it's so good you probably won't have leftovers anyway. It's like the sauce and guacamole had a beautiful, delicious baby.
Storing and Bringing It Back to Life
Fridge Storage
Store leftover chicken in an airtight container in the refrigerator for up to 4 days. The flavors actually intensify overnight, making this perfect for meal prep. Keep the sauce in a separate container — it'll thicken when cold but loosens up quickly at room temperature. When storing, place a piece of plastic wrap directly on the surface of the sauce to prevent a skin from forming. The chicken is delicious cold, especially shredded over salads or stuffed into sandwiches with extra sauce. If you find yourself eating it straight from the container at midnight, I won't judge — I've been there.
Freezer Friendly
Both the chicken and sauce freeze beautifully, though separately is best. Wrap chicken portions tightly in plastic wrap, then foil, and freeze for up to 3 months. The sauce can be frozen in ice cube trays for easy portioning — pop out a few cubes whenever you need a flavor boost. Thaw overnight in the refrigerator, then bring to room temperature before serving. The sauce might separate slightly after freezing, but a quick whisk brings it back together. Frozen chicken works wonderfully in tacos, enchiladas, or soups where texture isn't as critical.
Best Reheating Method
For the juiciest reheated chicken, skip the microwave and use the oven instead. Place chicken in a baking dish with a splash of chicken broth, cover with foil, and warm at 325°F for about 15 minutes. The steam from the broth keeps it moist without drying it out. For the sauce, let it come to room temperature naturally, or warm it very gently over low heat — too much heat can cause it to separate. If you're in a hurry, the microwave works for the sauce, but use 50% power and stir every 15 seconds. Whatever you do, don't overheat either component or you'll undo all your hard work.