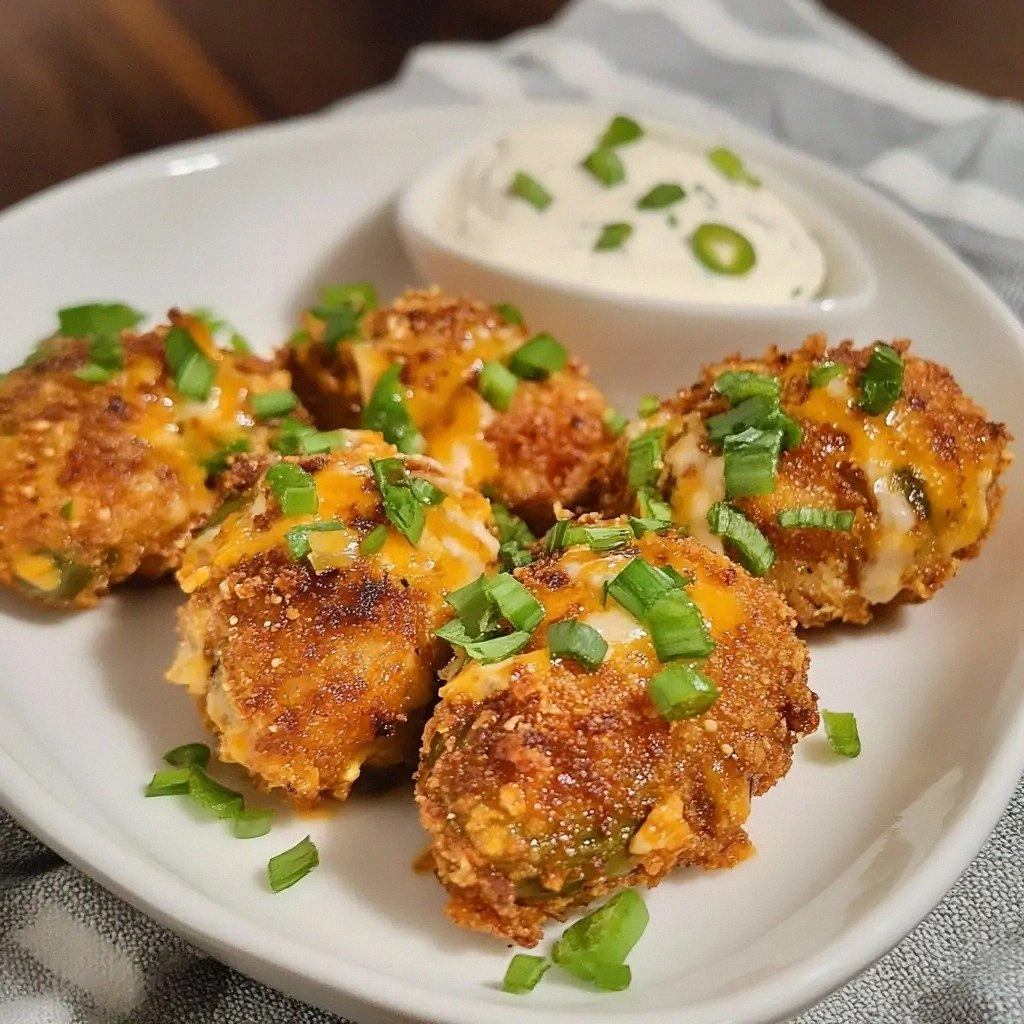
I was halfway through a chaotic Sunday dinner, juggling a pot of simmering sauce and a skillet of sizzling bacon when my phone buzzed with a text from my best friend: “I’m craving something spicy and cheesy for the party tonight. Send me a recipe!” I stared at the screen, the kitchen lights flickering, and thought, “Why not combine the best of both worlds?” The result? A batch of jalapeño chicken poppers that turned a simple gathering into a culinary celebration.
Picture the moment: the aroma of fresh jalapeños cutting through the air, the buttery crunch of panko coating, the creamy melt of cheddar and cream cheese clinging to every bite. The sizzle that hits the pan is like a drumbeat, signaling the start of a flavor symphony. Each popper, when bitten, releases a burst of heat that is instantly tempered by the coolness of the cheese—an exquisite dance of temperature and texture. My taste buds were dancing, and I knew I had stumbled upon a game‑changing recipe that would have everyone begging for seconds.
What makes this version a standout is not just the ingredients but the method that locks in moisture while achieving a golden, crisp exterior. I discovered that a quick blanch of the chicken before stuffing keeps the meat tender, while a light coating of flour before the breadcrumb step creates a subtle barrier that traps juices. The secret sauce? A splash of smoked paprika that adds depth without overpowering the jalapeño heat. I dare you to taste this and not go back for seconds.
I’ll be honest—half the batch vanished before anyone else got a chance to try it. That’s the kind of confidence you get when a recipe feels like a secret weapon. Picture yourself pulling these out of the oven, the whole kitchen smelling incredible, the guests’ eyes widening at the glossy, peppered edges. Let me walk you through every single step—by the end, you’ll wonder how you ever made it any other way.
What Makes This Version Stand Out
- Flavor: The blend of smoky paprika, fresh jalapeños, and creamy cheeses creates a layered taste that evolves with each bite.
- Texture: A crisp breadcrumb shell paired with a molten center delivers a satisfying crunch followed by silky melt.
- Convenience: The prep is quick—no complicated marinades, just a handful of pantry staples.
- Versatility: Works as an appetizer, a party snack, or a side dish for any meal.
- Make‑ahead: Assemble up to two days ahead; refrigerate, then bake just before serving.
- Ingredient Quality: Using fresh jalapeños and high‑fat cream cheese gives a depth that store‑bought substitutes can’t match.
- Crowd Appeal: The heat level is adjustable—perfect for both heat lovers and those who prefer a milder kick.
- Visual Impact: The bright green pop of jalapeño against golden cheese makes for Instagram‑worthy plating.
Inside the Ingredient List
The Flavor Base
The foundation of any great dish starts with a robust flavor base. The fresh jalapeños, diced finely, provide that bright, peppery bite that wakes up the palate. If you’re not a fan of intense heat, halve the quantity or remove the seeds. Swapping jalapeños for serrano peppers adds a sweeter, more vibrant heat that pairs beautifully with the creamy cheeses.
The Texture Crew
Texture is the unsung hero of this recipe. The all‑purpose flour forms a thin crust that helps the breadcrumb coating adhere, creating a golden shell. The panko breadcrumbs, with their airy crunch, add a satisfying bite that contrasts the creamy filling. If you’re gluten‑free, simply replace the flour and panko with a blend of almond flour and crushed cornflakes.
The Unexpected Star
Cream cheese is the secret to that luxurious, velvety melt. Its high fat content ensures the center stays gooey even after baking. Skipping it would result in a dry, crumbly popper that feels more like a snack than a savory bite. For a lower‑fat alternative, use a light cream cheese or a Greek yogurt blend, but be prepared for a slightly less rich texture.
The Final Flourish
The shredded cheddar cheese adds a sharp, tangy finish that balances the heat of the jalapeños. A pinch of smoked paprika deepens the flavor profile, giving the poppers a subtle smokiness that lingers on the tongue. If you’re a fan of herbs, a tablespoon of chopped fresh parsley sprinkled on top after baking adds a burst of color and freshness.
Everything's prepped? Good. Let's get into the real action...
The Method — Step by Step
- Preheat your oven to 400°F (200°C). Line a baking sheet with parchment paper to prevent sticking. This step ensures even heat distribution and a crisp bottom.
- Pat the chicken breasts dry with paper towels. This removes excess moisture and helps the coating stick. Season both sides with salt, pepper, and a light dusting of garlic powder.
- In a shallow dish, whisk the eggs with a splash of water to loosen them. In a separate bowl, combine the flour and smoked paprika. Dredge each chicken piece first in the flour mixture, then dip into the egg wash, and finally coat with panko breadcrumbs. The double coating creates a protective barrier that locks in juices.
- Place the coated chicken on the prepared baking sheet and bake for 18 minutes, or until the internal temperature reaches 165°F (74°C). The edges will start pulling away, signaling that the chicken is cooked through.
- Remove the chicken from the oven and let it rest for 5 minutes. This allows the juices to redistribute, preventing a dry center.
- While the chicken rests, melt the butter in a small saucepan over low heat. Add the cream cheese and shredded cheddar, stirring until smooth and creamy. The butter enriches the filling and helps the cheese melt evenly.
- Slice each chicken breast in half lengthwise, creating a pocket. Spoon the cheese‑jalapeño mixture into each pocket, then fold the halves back together. The filling should be snug but not overpacked.
- Return the stuffed chicken to the oven for an additional 5 minutes, just until the cheese is bubbly and the edges of the chicken are golden brown. This final bake seals in the flavors and gives the poppers a mouth‑watering shine.
That's it — you did it. But hold on, I've got a few more tricks that'll take this to another level...
Insider Tricks for Flawless Results
The Temperature Rule Nobody Follows
Many cooks set the oven to 350°F, but 400°F gives that crisp exterior without overcooking the interior. The higher heat creates a Maillard reaction that gives the breadcrumbs a golden, caramelized finish. If you’re baking on a lower‑end oven, increase the temperature by 25°F and monitor closely.
Why Your Nose Knows Best
Your sense of smell is a reliable indicator of doneness. When the cheese is bubbling and the aroma is rich and buttery, the poppers are ready. If the scent is faint, give them a few more minutes.
The 5-Minute Rest That Changes Everything
Resting the chicken after the first bake allows the juices to redistribute, ensuring each bite is moist. Skipping this step often results in a dry center that feels like a snack rather than a savory dish.
The Quick Flip Trick
Flip the chicken halfway through baking to guarantee even browning on both sides. This simple move eliminates uneven heat exposure and results in a uniformly crisp exterior.
The Jalapeño Squeeze
If you’re sensitive to heat, squeeze the jalapeños to remove the seeds before dicing. The seeds carry most of the capsaicin, so this step reduces the burn while keeping the flavor.
Creative Twists and Variations
This recipe is a playground. Here are some of my favorite ways to switch things up:
Crispy Buffalo Popper
Swap the cheddar for smoked gouda and drizzle a spicy buffalo sauce over the filling. Serve with blue cheese dip for an extra kick.
Mediterranean Delight
Replace jalapeños with sun‑dried tomatoes and add chopped kalamata olives to the cheese mixture. Finish with a sprinkle of feta for a tangy finish.
Cheese Lover’s Dream
Layer mozzarella, provolone, and a hint of Parmesan between the chicken and jalapeño for a gooey, melty experience that satisfies every cheese connoisseur.
Vegan Version
Use tofu or tempeh instead of chicken, and substitute the cheese with a plant‑based cheddar alternative. The texture changes, but the flavor profile remains delicious.
Breakfast Popper
Add a dash of cinnamon to the breadcrumb mixture and serve with a drizzle of maple syrup for a sweet‑spicy breakfast treat.
Storing and Bringing It Back to Life
Fridge Storage
Store uncooked stuffed chicken in an airtight container for up to 2 days. When ready, bake as directed. The chicken remains juicy, and the filling stays intact.
Freezer Friendly
Wrap each stuffed piece tightly in foil and place in a freezer bag. Freeze for up to 3 months. Thaw overnight in the fridge before baking.
Best Reheating Method
Reheat in a 350°F oven for 10–12 minutes, or until heated through. Add a splash of water or broth before reheating to steam the filling back to perfection.