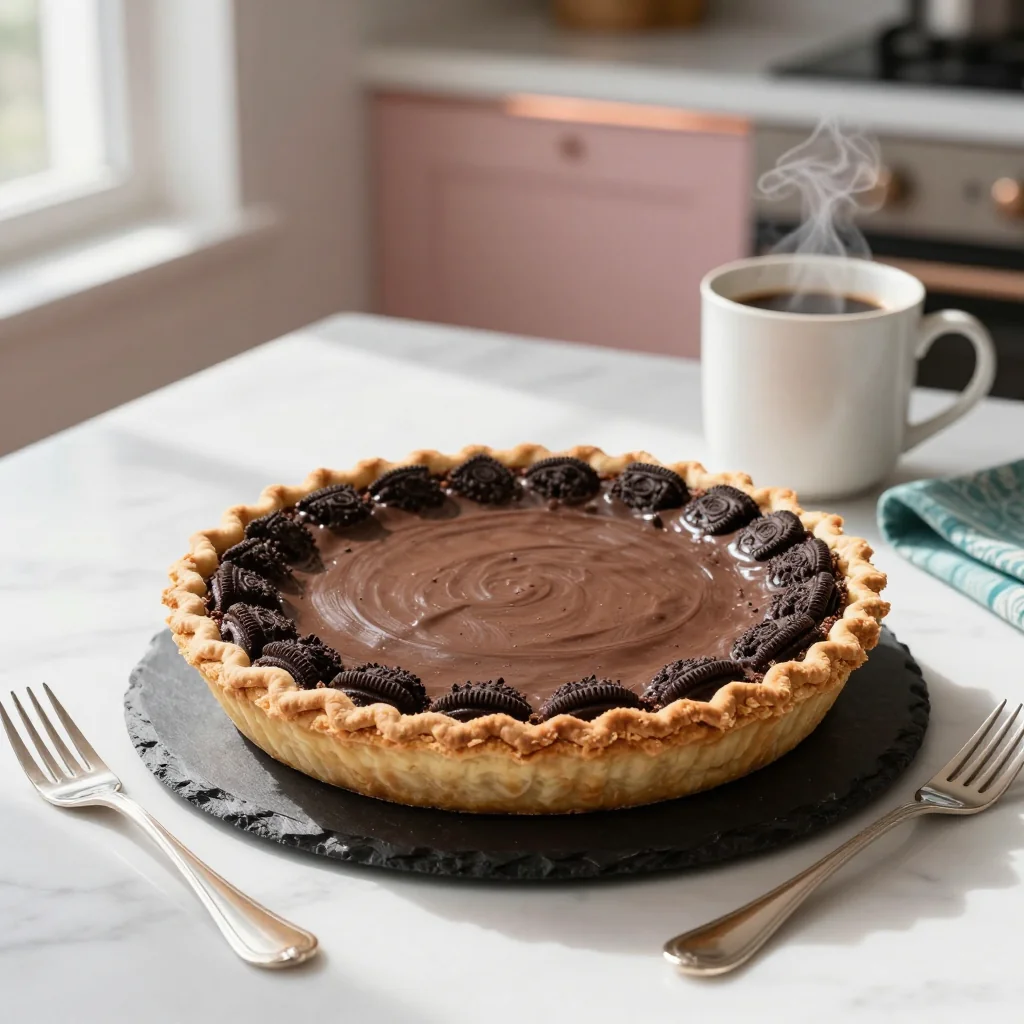
A luscious, velvety chocolate cream pie built on a crunchy Oreo cookie crust – perfect for celebrations or a cozy night in.
I still remember the first time I tasted a slice of chocolate cream pie at my grandmother’s kitchen. The moment the fork broke through the buttery Oreo crust, a cascade of silky chocolate filling spilled over my taste buds, and I was instantly transported to a world where dessert was pure joy. The aroma of melted chocolate mingled with the faint caramel notes of the cookies, creating an unforgettable sensory experience that still lingers in my memory.
This classic American dessert traces its roots back to the 1950s, when home bakers began experimenting with packaged cookies as a quick base for pies. The Oreo, with its perfect balance of chocolate and cream, quickly became the star of many no‑bake creations. Over the decades, the recipe has evolved, embracing richer chocolates, smoother creams, and elegant plating that makes it suitable for both casual family dinners and upscale gatherings.
In this article, I’ll walk you through every step—from crushing the cookies to achieving that glossy chocolate sheen—so you can recreate the magic in your own kitchen. You’ll learn why each ingredient matters, how to avoid common pitfalls, and the secrets that give this pie its unforgettable texture and flavor.
I’m thrilled to share this beloved recipe with you, and I hope it becomes a staple in your dessert repertoire. Let’s dive in and make something truly spectacular!
🌟 Why This Recipe Will Win Your Heart
From the first bite to the lingering aftertaste, this pie offers a harmony of textures and flavors that keep you coming back for more.
- ✨ Irresistible Crunch‑and‑Cream Contrast: The Oreo crust provides a buttery crunch that perfectly balances the velvety chocolate filling, creating a mouthfeel that’s both satisfying and luxurious.
- ✨ Simple No‑Bake Technique: No oven is required for the crust, making it an ideal dessert for hot summer evenings or when you simply don’t want to heat up the kitchen.
- ✨ Customizable Sweetness: By adjusting the amount of powdered sugar or opting for dark versus milk chocolate, you can tailor the sweetness level to suit any palate.
- ✨ Crowd‑Pleasing Appeal: Chocolate is a universal favorite, and the familiar Oreo flavor adds a nostalgic twist that delights both kids and adults.
- ✨ Versatile Presentation: Serve it in a classic pie dish, individual ramekins, or even as elegant mini tartlets for cocktail parties.
- ✨ Time‑Efficient Preparation: With a total hands‑on time of under 30 minutes, you can create a show‑stopping dessert without spending hours in the kitchen.
🥗 Ingredients
📝 Complete Ingredient List
For the Oreo Crust:
For the Chocolate Cream Filling:
For the Topping:
🔍 Focus on Key Ingredients
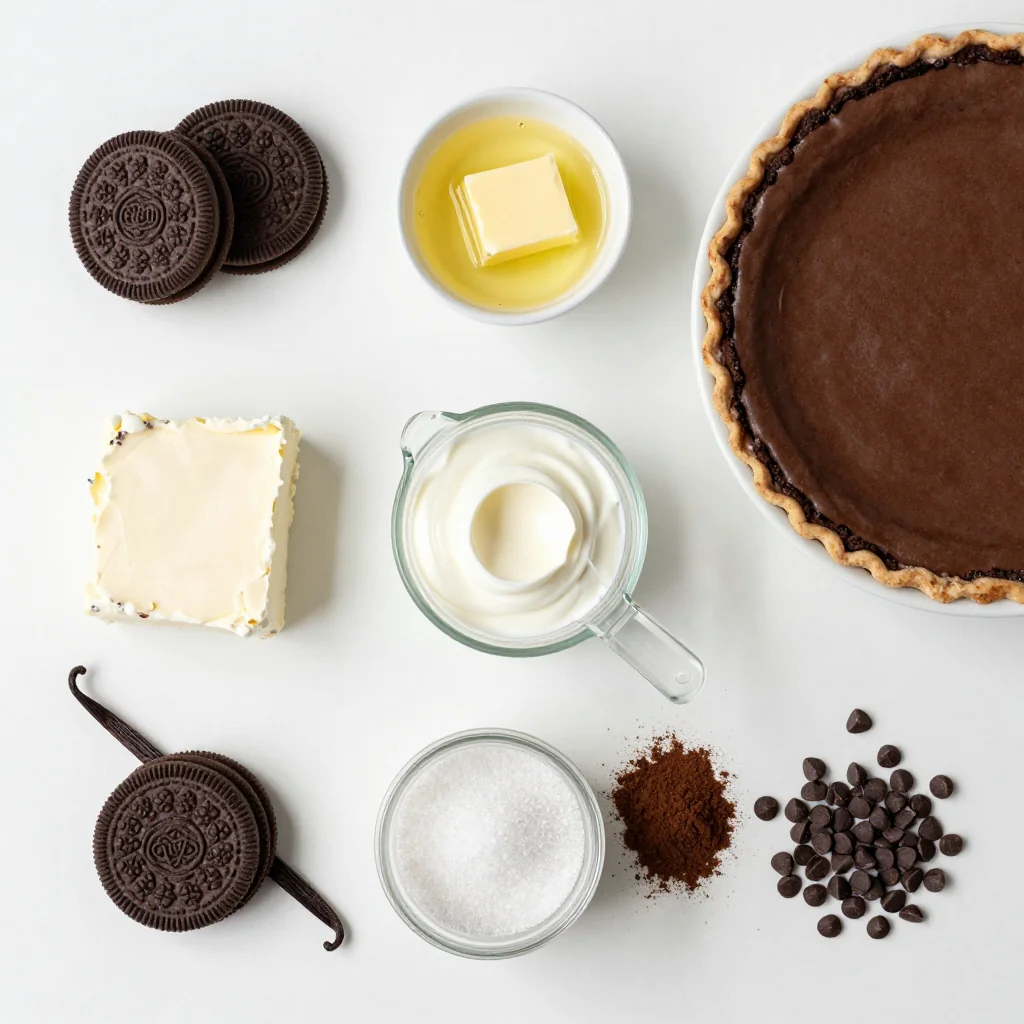
Oreo Cookies
Oreo cookies bring a distinctive chocolate‑and‑cream flavor that forms the backbone of the crust. Choose the classic original variety for the most authentic taste, but feel free to experiment with double‑stuf or flavored versions for a twist. The cookies should be finely crushed to ensure a uniform crust that holds together without being too dense.
Dark Chocolate (70% Cacao)
High‑percentage dark chocolate provides depth, slight bitterness, and a glossy finish that contrasts beautifully with the sweet cream cheese base. When melting, use a double‑boiler or microwave in short bursts, stirring between intervals to avoid scorching. If you prefer a sweeter profile, substitute with 60% cacao chocolate.
Cream Cheese
Full‑fat cream cheese contributes richness and a subtle tang that balances the sweetness of the powdered sugar and chocolate. Soften it at room temperature before mixing; this prevents lumps and ensures a silky texture. For a lighter version, you can blend half cream cheese with Greek yogurt, but the classic version yields the most luxurious mouthfeel.
🔄 Quick Substitutions
| If you don’t have... | Use instead... |
|---|---|
| Oreo cookies | Chocolate wafer cookies or chocolate graham crackers |
| Heavy cream | Coconut cream (for dairy‑free) or half‑and‑half |
| Dark chocolate | Milk chocolate (for sweeter) or semi‑sweet chocolate chips |
👨🍳 Step‑by‑Step Instructions
Follow these detailed steps to create a flawless chocolate cream pie that will impress every guest.
📋 Phase 1: Crust Preparation
Start by building a sturdy, buttery Oreo base.
Crush the Oreo Cookies
Place the 24 Oreo cookies in a large zip‑top bag and crush them with a rolling pin until they become fine crumbs. Alternatively, pulse them in a food processor for 5‑10 seconds. The crumbs should resemble coarse sand, not a powder.
Combine with Melted Butter
Transfer the crumbs to a mixing bowl, pour in the 3 tbsp melted unsalted butter, and stir until the mixture holds together when pressed between your fingers. If it feels dry, add an extra half‑tbsp of butter.
🔥 Phase 2: Filling & Assembly
Create a silky chocolate‑cream filling and combine it with the crust.
Beat Cream Cheese Until Smooth
In a stand mixer fitted with the paddle attachment, beat the 226 g softened cream cheese on medium speed for 2‑3 minutes until completely smooth and free of lumps.
Add Powdered Sugar and Vanilla
Gradually add the 200 g powdered sugar while the mixer runs on low. Follow with 1 tsp vanilla extract. Scrape the sides of the bowl to ensure even incorporation.
Incorporate Melted Dark Chocolate
Gently fold the 226 g melted dark chocolate into the cream cheese mixture using a spatula. The mixture will become glossy and thick. Finally, whip the 240 ml heavy cream to soft peaks and fold it in, creating a light, airy texture.
✨ Phase 3: Chill, Finish & Serve
Allow the pie to set and add the finishing touches.
Press Crust into Pie Dish
Evenly press the Oreo‑butter mixture into the bottom and up the sides of a 9‑inch springform pan. Use the back of a measuring cup to compact the crust firmly.
Fill with Chocolate Cream
Pour the chocolate cream filling over the crust, smoothing the top with an offset spatula. Tap the pan gently on the counter to release any air bubbles.
Chill the Pie
Cover the pie loosely with plastic wrap and refrigerate for at least 4 hours, preferably overnight, to allow the filling to set fully.
Garnish and Serve
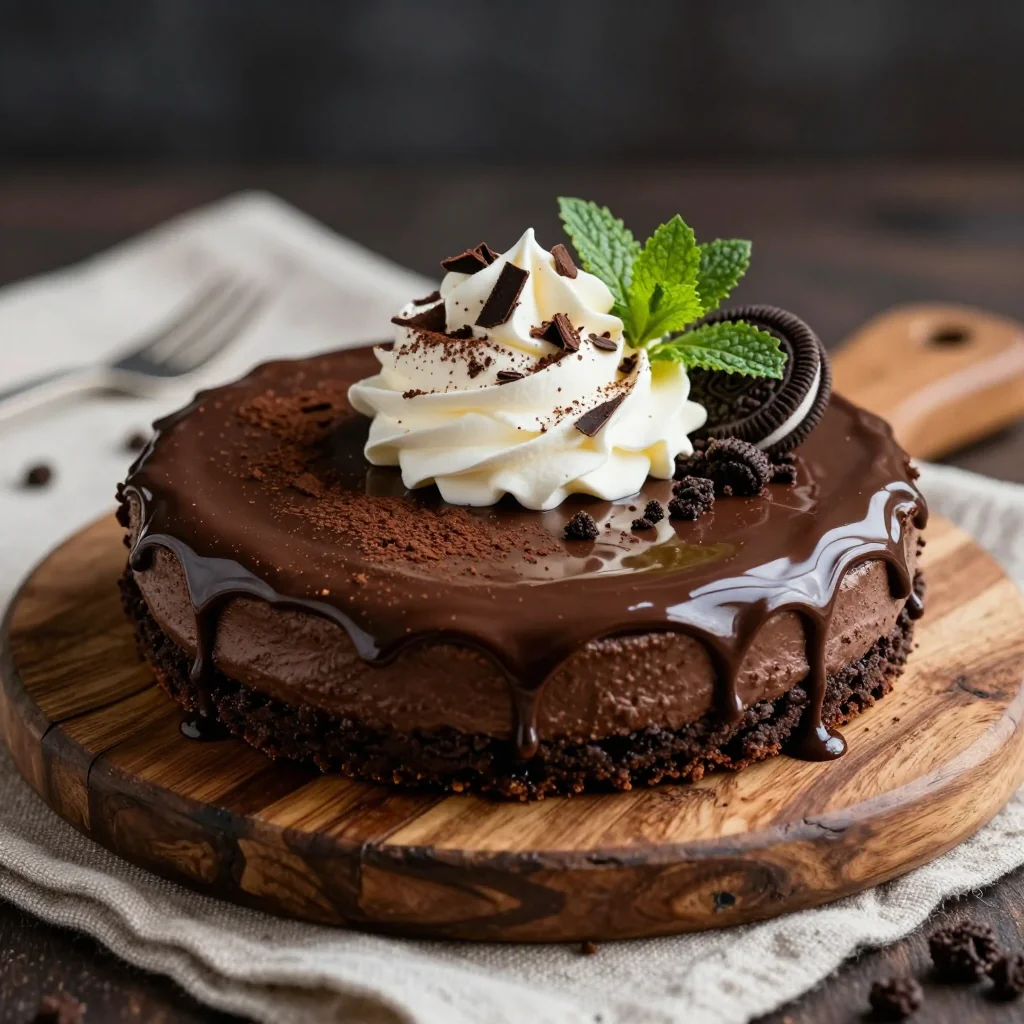
Before serving, pipe or dollop the whipped cream around the edge, sprinkle chocolate shavings, and add a handful of fresh berries if desired. Slice with a hot, wet knife for clean cuts.
💡 Expert Tips & Tricks
🛒 Choosing the Right Ingredients
When selecting Oreo cookies, look for those with a crisp wafer and generous cream filling; avoid any that appear stale or have broken pieces. For chocolate, a 70% cacao bar provides the perfect balance of bitterness and sweetness—higher percentages can become too bitter, while lower percentages may taste overly sweet. Lastly, use heavy cream with at least 35% fat; this ensures the whipped topping holds its shape.
🔪 Preparation Techniques
Crushing the cookies uniformly is crucial; uneven crumbs can create weak spots in the crust. Use a food processor for speed, but pulse carefully to avoid turning them into powder. When beating cream cheese, start on low speed to prevent splattering, then increase to medium once the texture is smooth. Folding the melted chocolate gently preserves the airy structure created by the whipped cream.
🌡️ Mastering the Chill
The pie needs a solid set time. Refrigerate for at least four hours; this allows the butter in the crust to solidify and the chocolate‑cream to firm up. For an extra firm texture, place the pie in the freezer for 20 minutes right before serving—just be careful not to let it freeze completely.
🍽️ Presentation and Service
Use a hot, wet knife to cut clean slices; dip the blade in hot water, wipe dry, and slice. For an elegant finish, drizzle a thin ribbon of melted chocolate across the top and sprinkle a pinch of flaky sea salt. Serve the pie chilled on a white platter with fresh berries on the side for a pop of color.
🏆 Pro Tips
Professional chefs rely on precision and technique to elevate a simple dessert into a masterpiece.
- 🎯 Temperature Control: Keep all dairy components (cream cheese, butter, heavy cream) at the same cool room temperature before mixing. This prevents the chocolate from seizing when it meets colder ingredients.
- 🎯 Double‑Boiler Method: Melt chocolate over simmering water, never directly on the flame. This gentle heat preserves the chocolate’s bloom and prevents a grainy texture.
- 🎯 Whipping Cream Properly: Chill the mixing bowl and whisk attachments for at least 15 minutes before whipping. Cold tools help the cream reach soft peaks faster and hold its structure longer.
- 🎯 Avoid Over‑Beating: Once the cream cheese is smooth, stop mixing. Over‑beating incorporates excess air, leading to cracks when the pie sets.
- 🎯 Crust Pressing Technique: Press the crust firmly but evenly; use the bottom of a glass to compact the mixture without tearing the pan.
- 🎯 Garnish Timing: Add whipped cream and chocolate shavings just before serving. If left too long, the garnish can melt into the filling, losing its textural contrast.
"A perfect pie is a harmony of texture, flavor, and timing—master each, and the dessert sings." — Jacques Pépin
🔄 Variations & Adaptations
This pie is a canvas; feel free to experiment with dietary needs, flavor profiles, and serving sizes.
🥬 Vegetarian / Vegan Version
Swap the dairy components for plant‑based alternatives: use vegan cream cheese (such as a cashew‑based spread), coconut cream instead of heavy cream, and vegan dark chocolate. Replace Oreo cookies with a vegan chocolate wafer or gluten‑free chocolate sandwich cookies.
- Vegan cream cheese – 226 g (same quantity, plant‑based)
- Coconut cream – 240 ml (provides similar richness)
🌶️ Flavor Variations
Adjust the flavor profile to match the season or your personal cravings.
Espresso Infusion:
Add 1 tsp finely ground espresso to the melted chocolate for a mocha twist.
Orange Zest:
Stir in 1 tbsp freshly grated orange zest into the cream cheese mixture for a bright citrus note.
Spicy Chili:
Mix ½ tsp cayenne pepper into the chocolate for a subtle heat that awakens the palate.
⚠️ Dietary Adaptations
Gluten‑Free:
Use gluten‑free chocolate sandwich cookies or crushed gluten‑free chocolate graham crackers in place of traditional Oreos.
Lactose‑Free:
Replace cream cheese with lactose‑free cream cheese, heavy cream with coconut cream, and ensure the chocolate is dairy‑free.
Low‑Calorie:
Reduce powdered sugar to 150 g, use light cream cheese (or a 50/50 mix of cream cheese and Greek yogurt), and halve the chocolate amount while adding a tablespoon of unsweetened cocoa powder for flavor.
👶 Family / Kids Version
Make mini pies in muffin tins for portion control and fun presentation. Use colorful sprinkles instead of chocolate shavings, and let kids help crush the cookies and spread the crust.
📦 Storage & Reheating
🧊 Conservation
Refrigerator:
- Duration: 3 days
- Container: Airtight glass or plastic pie dish
- Tip: Cover the top with plastic wrap to prevent the whipped cream from absorbing fridge odors.
Freezer:
- Duration: 2 months
- Method: Wrap the entire pie tightly in two layers of aluminum foil, then place in a freezer‑safe bag.
- Defrosting: Transfer to the refrigerator overnight, then let sit at room temperature for 15 minutes before serving.
💡 For best texture, consume within one month of freezing; the crust may soften slightly after long storage.
♨️ Reheating
🔥 Oven (Recommended):
- Preheat to 150 °C (300 °F).
- Cover the pie loosely with aluminum foil.
- Heat for 10 minutes, then remove foil and heat an additional 5 minutes to restore a slight crust crispness.
⚡ Microwave (Quick):
- Place a slice on a microwave‑safe plate.
- Cover with a microwave‑safe lid or parchment.
- Heat on medium power for 30 seconds, check, then continue in 15‑second bursts until warmed through.
🍳 Stovetop:
If you prefer a pan‑warmed slice, place it in a non‑stick skillet over low heat, cover, and warm for 2‑3 minutes, flipping once.
🍷 Perfect Pairings
🥗 Side Dishes
- Fresh Berry Salad: A mix of strawberries, blueberries, and mint adds acidity that cuts through the richness.
- Light Citrus Sorbet: A scoop of lemon or orange sorbet refreshes the palate between bites.
- Caramelized Banana Slices: Warm banana slices with a drizzle of caramel complement the chocolate’s depth.
🍷 Wine & Beverage
- Port Wine (Ruby): Its sweet, fruity notes echo the chocolate while adding complexity.
- Espresso Martini: The coffee bitterness balances the creamy sweetness.
- Non‑Alcoholic: Sparkling water with a splash of orange bitters for a sophisticated mocktail.
🍰 Complementary Courses
Begin with a light citrus appetizer such as a grapefruit and arugula salad, follow the pie with a cheese platter featuring mild brie and fig jam, and finish with a palate‑cleansing espresso or herbal tea.
❓ Frequently Asked Questions
Q: Can I use regular chocolate chips instead of a chocolate bar?
A: Yes, high‑quality semi‑sweet chocolate chips work well, but melt them gently to avoid a grainy texture. If using chips, add a tablespoon of cocoa butter to improve gloss and fluidity.
Q: How do I prevent the crust from becoming soggy?
A: Ensure the butter is fully incorporated and the crust is firmly pressed. Chill the crust for 10 minutes before adding the filling; this creates a barrier that minimizes moisture transfer.
Q: Is it possible to make this pie gluten‑free?
A: Absolutely. Substitute the Oreo cookies with gluten‑free chocolate sandwich cookies or crushed gluten‑free chocolate graham crackers. Verify that the chocolate you use is also labeled gluten‑free.
Q: My filling cracked after chilling—what went wrong?
A: Cracks often result from over‑mixing or rapid temperature changes. Beat the cream cheese just until smooth, avoid whipping the cream to stiff peaks, and let the pie chill gradually in the refrigerator rather than the freezer.
Q: Can I prepare this pie ahead of time for a party?
A: Yes, you can assemble the crust and fill the pie up to 24 hours in advance. Keep it refrigerated, covered with plastic wrap. Add the whipped cream topping and chocolate shavings just before serving to maintain freshness.
Q: How do I scale the recipe for more or fewer servings?
A: Use the portion adjuster in the premium recipe card below. The built‑in script recalculates ingredient quantities automatically based on the number of servings you select (minimum 1, maximum 20).
🎉 Let’s Get Baking!
This Chocolate Cream Pie with Oreo Crust blends the comforting crunch of a classic cookie base with a decadently smooth chocolate filling, creating a dessert that feels both familiar and indulgent. Whether you’re impressing guests at a dinner party or treating yourself after a long day, the balance of textures and flavors will make every bite unforgettable. Remember, the key lies in precise temperature control, gentle folding, and ample chilling time—follow the steps, and you’ll achieve a professional‑grade result every time.
I can’t wait to see how your pies turn out! Share your photos, variations, or any questions in the comments below. Your feedback helps me refine the recipe and inspires new creations.
Have you tried this recipe?
Leave a comment and rating below! Share your masterpiece on Instagram with #OreoChocolatePie for a chance to be featured.
Chocolate Cream Pie with Oreo Crust
A velvety chocolate cream pie on a buttery Oreo cookie crust, perfect for any celebration.
📝 Ingredients
Oreo Crust
Chocolate Cream Filling
Topping
👨🍳 Instructions
- 1 Crush the Oreo cookies into fine crumbs and mix with melted butter; press into a 9‑inch springform pan.
- 2 Chill the crust for 10 minutes while preparing the filling.
- 3 Beat softened cream cheese until smooth; add powdered sugar and vanilla.
- 4 Fold melted dark chocolate into the cream cheese mixture.
- 5 Whip heavy cream to soft peaks and gently fold into the chocolate mixture.
- 6 Pour filling over the chilled crust; smooth the top.
- 7 Refrigerate for at least 4 hours (overnight preferred).
- 8 Before serving, top with whipped cream, chocolate shavings, and optional berries.
- 9 Slice with a hot, wet knife for clean cuts.
- 10 Enjoy and share with friends!
🥗 Nutritional Information (per serving)
*Nutritional values are estimates based on standard ingredient brands.
📚 You Might Also Like
Salted Caramel Tart
Lemon Blueberry Cheesecake
Tiramisu Layer Cake


💬 Comments & Reviews
Leave a Comment
No comments yet. Be the first to share your thoughts!