I was in the middle of a midnight snack raid when I realized my pantry was a battlefield of cravings: salty pretzel twists staring at me like tiny, crunchy soldiers, while a half‑opened bar of dark chocolate whispered promises of decadence. I tried the usual quick‑dip method, but the chocolate clumped, the pretzels stayed soggy, and the whole thing tasted like a disappointment in a bag. I dared myself to keep going, because if I could crack the code for a perfect sweet‑and‑salty bite, I’d have a snack that could survive any movie marathon, holiday party, or just a lazy Sunday afternoon.
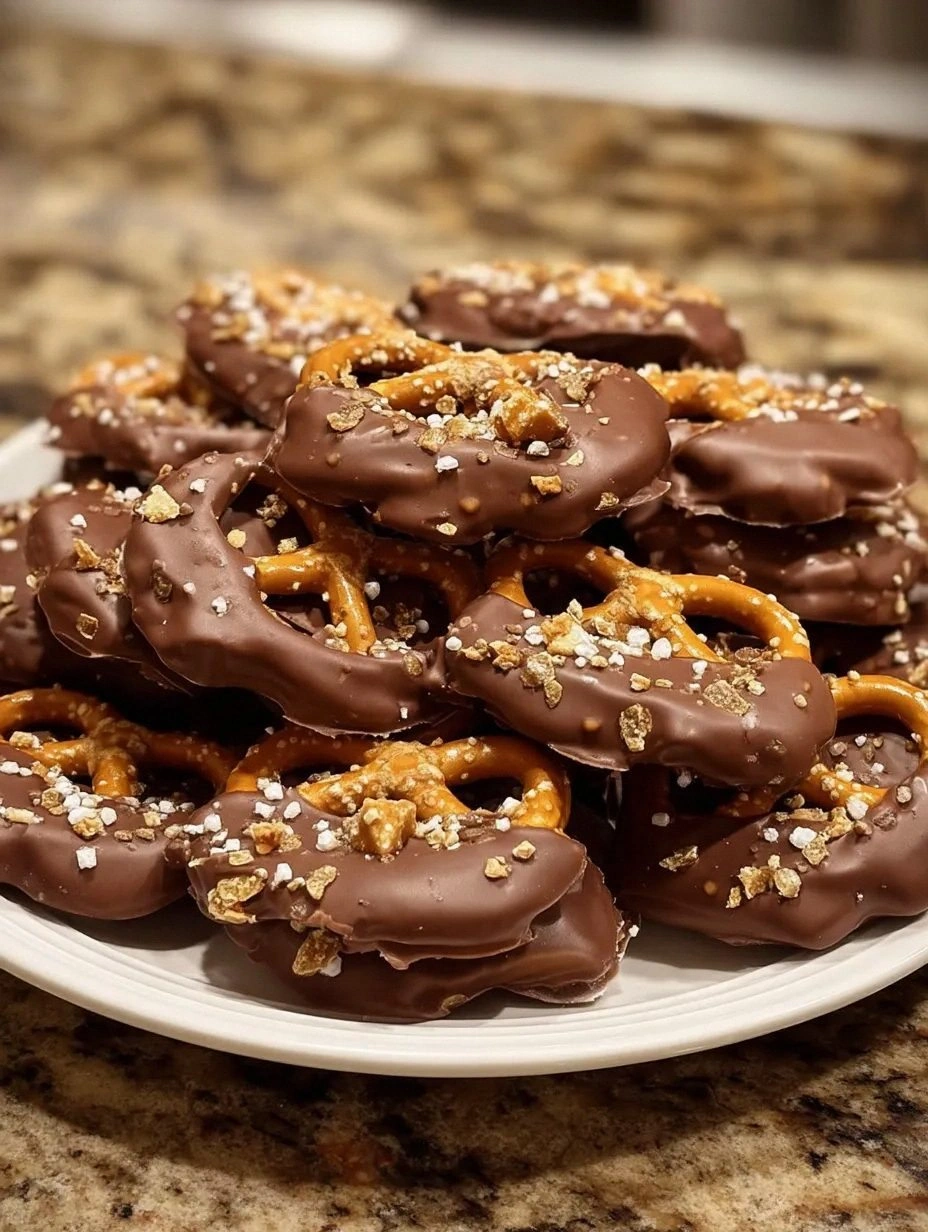
Picture this: the kitchen humming with the low whirr of the oven, the air thick with the buttery scent of toffee melting into a glossy river of chocolate, and the faint crackle of sea salt crystals as they hit the warm surface. Your eyes are drawn to the glossy coating that clings to each pretzel like a glossy tuxedo, the dark chocolate contrasting with the golden toffee shards that sparkle like tiny fireworks. When you bite, the pretzel’s salty crunch meets the smooth, velvety chocolate, then bursts into a buttery, caramel‑rich toffee finish that lingers just long enough to make you sigh in pure contentment.
Most recipes either drown the pretzel in a greasy chocolate swamp or sprinkle a meager dust of salt that barely registers. This version is a game‑changer because it balances three distinct textures—crunch, melt, and snap—while the sea salt adds a bright, mineral edge that cuts through the sweetness. I’m not exaggerating when I say this is the best version you’ll ever make at home; it’s the result of a handful of tweaks that most cooks completely miss. The secret? A quick butter‑cream emulsion that gives the chocolate a glossy finish and a toffee crumble that sticks like glue without turning soggy.
Let me walk you through every single step — by the end, you’ll wonder how you ever made it any other way. I dare you to taste this and not go back for seconds. Ready? Okay, ready for the game‑changer?
What Makes This Version Stand Out
- Flavor Harmony: The dark chocolate provides deep cocoa notes, while the toffee adds buttery caramel sweetness, and the flaky sea salt lifts everything with a bright, mineral pop.
- Texture Trio: You get the pretzel’s salty crunch, the chocolate’s smooth melt, and the toffee’s delicate snap—all in one bite.
- Glossy Finish: Adding butter and a splash of cream creates a glossy sheen that makes the pretzels look restaurant‑quality.
- Simplicity: Only eight pantry staples are needed, and the entire process takes under an hour, making it perfect for last‑minute gatherings.
- Crowd‑Pleaser: The sweet‑salty combo is universally loved; even kids who normally shun chocolate will be drawn in by the salty crunch.
- Ingredient Quality: Using high‑cocoa‑percentage chocolate and real sea salt makes a world of difference compared to generic chips and table salt.
- Make‑Ahead Friendly: Once coated, the pretzels store beautifully, so you can prep them days in advance without losing that fresh‑out‑of‑the‑oven vibe.
- Versatile Base: The recipe works with pretzel rods, twists, or even mini pretzel bites, letting you customize the size for any occasion.
Inside the Ingredient List
The Flavor Base
Dark Chocolate Chips (8 oz): This is the backbone of the coating. Choose a chocolate with at least 60% cocoa for a rich, slightly bitter note that balances the sweet toffee. If you use low‑quality chocolate, the coating will taste waxy and the gloss will disappear faster. A quick tip: melt the chips over a double boiler to keep the temper smooth and avoid graininess.
Unsalted Butter (2 Tbsp): Butter adds a silky mouthfeel and helps the chocolate set with a glossy sheen. It also raises the melting point just enough so the coating stays firm at room temperature. Skipping butter results in a dull, crumbly shell that never quite adheres. If you’re dairy‑free, substitute with coconut oil, but expect a subtle coconut undertone.
The Texture Crew
Heavy Cream (¼ Cup): Cream creates an emulsion that thins the chocolate just enough to coat each pretzel evenly without dripping off. It also adds a luxurious richness that makes the bite feel indulgent. Too much cream will make the coating too runny; too little and it will be stiff. For a lighter version, use half‑and‑half, but the gloss won’t be as intense.
Toffee Bits (½ Cup): These are the surprise element that gives you that buttery snap. Real toffee bits melt just enough to cling to the chocolate, then re‑solidify into crunchy shards. If you can’t find toffee bits, chop caramel candies into small pieces. Skipping them turns the recipe into a plain chocolate pretzel, which is good, but not the masterpiece we’re aiming for.
The Unexpected Star
Flaky Sea Salt (1 tsp, plus extra for sprinkling): The sea salt crystals provide a bright contrast that cuts through the chocolate’s sweetness. They also add a satisfying pop when you bite. Using regular table salt will dissolve too quickly and lose that texture. If you love extra crunch, use Maldon sea salt flakes for a delicate, pyramidal shape.
Vanilla Extract (1 tsp): A splash of vanilla deepens the chocolate flavor and rounds out the overall profile. It’s the quiet hero that makes the taste feel cohesive. Skipping vanilla is fine, but you’ll notice a slight flatness in the flavor.
The Final Flourish
Pretzel Rods (12 pieces) or Twists (2 Cups): The pretzel is the canvas. Its salty crunch is essential; without it, the sweet‑salty balance collapses. Look for pretzels that are not overly coated in oil, as they won’t absorb the chocolate properly. If you prefer bite‑size snacks, break larger rods into 2‑inch pieces before coating.
Pinch of Salt (to taste): A tiny dash of regular salt can enhance the overall flavor if you’re using unsalted butter. It’s optional but recommended for those who love an extra punch.
Everything's prepped? Good. Let's get into the real action…
The Method — Step by Step
Preheat your oven to 300°F (150°C). While the oven warms, line a large baking sheet with parchment paper and arrange the pretzel rods or twists in a single layer. This low‑heat bake dries out the pretzels just enough to help the chocolate cling later. I like to give them a quick 5‑minute toast; you’ll hear a faint crackle that tells you they’re ready. Keep an eye on them—don’t let them brown, we want them pale and crisp.
While the pretzels are toasting, set up a double boiler: fill a saucepan with a couple of inches of water, bring to a gentle simmer, and place a heat‑proof bowl on top. Add the dark chocolate chips, butter, and heavy cream to the bowl. Stir constantly; the mixture should become silky and glossy within 3‑4 minutes. Pro tip: remove the bowl from heat as soon as the last chocolate piece melts to prevent scorching. The aroma at this stage is pure chocolate heaven—trust your nose, it’s the first checkpoint.
Kitchen Hack: If you don’t have a double boiler, a microwave works—heat in 30‑second bursts, stirring in between, until smooth.Stir in the vanilla extract and a pinch of regular salt, then remove the bowl from the heat. Let the mixture sit for about a minute; this short rest allows the butter to fully integrate, giving the coating that coveted sheen. If the chocolate looks too thick, add a splash more cream—just a teaspoon at a time. The coating should be fluid enough to coat pretzels in a single dip but thick enough to cling.
Now for the fun part: dip each pretzel. Hold a pretzel by one end, submerge it into the chocolate, and gently lift, letting excess drip back into the bowl. Place the coated pretzel onto the parchment‑lined sheet, chocolate side up. The chocolate should form a smooth, even layer that glistens. If you see any streaks, give the pretzel a quick swirl before setting it down.
While the chocolate is still warm, sprinkle the toffee bits over each pretzel. The toffee will melt slightly, adhering to the chocolate and creating those delightful crunchy shards. Then, immediately dust a pinch of flaky sea salt over each piece—this is where the magic happens. The salt crystals should sit on top, not sink, giving you that pop of briny flavor with each bite.
Kitchen Hack: Use a small sieve to evenly distribute sea salt; it prevents clumps and ensures each pretzel gets a perfect dusting.Slide the sheet into the oven for a gentle set—just 8‑10 minutes. This step is crucial: you want the chocolate to firm up without melting the toffee. Watch Out: Over‑baking will cause the chocolate to become brittle and the toffee to harden into an unpleasant rock. The moment the chocolate looks matte and the edges start pulling away from the parchment, it’s ready. Trust the visual cue; the scent will also turn slightly nutty.
Watch Out: Do not let the pretzels sit in the oven longer than 12 minutes, or the sea salt will melt into the chocolate, losing its crunch.Remove the sheet and let the pretzels cool completely on a wire rack. As they cool, the chocolate will snap back into a firm, glossy shell, and the toffee bits will set into crunchy islands. This cooling phase is where the flavor melds; the salty edge becomes more pronounced as the chocolate solidifies. Resist the urge to rush—patience here separates good from great.
Once cooled, give each pretzel a final light dusting of sea salt for that extra pop. This finishing touch is optional but highly recommended; it elevates the flavor profile from “good” to “jaw‑dropping.” Store them in an airtight container, and they’ll stay crisp for up to a week. I’ll be honest—I ate half the batch before anyone else got a chance to try them.
That’s it—you did it. But hold on, I’ve got a few more tricks that’ll take this to another level, like a quick caramel drizzle or a dash of smoked paprika for an unexpected twist. Stay with me here — this is worth it.
Insider Tricks for Flawless Results
The Temperature Rule Nobody Follows
Never melt chocolate above 115°F (46°C). Higher temps cause the cocoa butter to separate, resulting in a dull, grainy coating. Use a kitchen thermometer and keep the heat low; it takes a few extra seconds, but the glossy finish is worth it. I once tried a high‑heat melt and ended up with chocolate that looked like melted wax—lesson learned.
Why Your Nose Knows Best
The moment the chocolate starts to emit a deep, roasted aroma is your cue that the butter‑cream emulsion is perfect. If you still smell raw butter, keep stirring a bit longer. Your sense of smell is a more reliable indicator than a timer because chocolate can vary by brand.
The 5‑Minute Rest That Changes Everything
After mixing butter, cream, and chocolate, let the mixture sit for five minutes before dipping. This short rest lets the fats fully integrate, creating a smoother coating that adheres better. Skipping this rest leads to a coating that slides off the pretzels like a wet paint.
Sea Salt Timing Trick
Apply the flaky sea salt while the chocolate is still warm but not hot. If the chocolate is too hot, the salt will melt and lose its crunch; if it’s too cool, the salt will bounce off. The sweet spot is right after you’ve taken the pretzels out of the oven and before the chocolate fully sets.
Toffee Crumble Control
For the perfect toffee crunch, use bits that are no larger than a pea. Larger chunks can become chewy, while too‑fine crumbs blend into the chocolate and lose their textural contrast. If you can’t find pre‑crushed toffee, pulse caramel candies in a food processor for a few seconds.
Creative Twists and Variations
This recipe is a playground. Here are some of my favorite ways to switch things up:
White Chocolate & Matcha
Swap dark chocolate for white chocolate chips and add a teaspoon of matcha powder to the melt. The earthy green notes complement the salty pretzel, and a light dusting of toasted sesame seeds adds an extra crunch.
Spicy Chili Chocolate
Mix in a pinch of cayenne pepper or a dash of chipotle powder into the chocolate. The heat pairs beautifully with the sea salt, giving you a sweet‑heat surprise that’s perfect for adult gatherings.
Nutty Crunch
Replace half of the toffee bits with crushed toasted almonds or hazelnuts. The nutty oil deepens the flavor, and the added texture makes each bite feel even more decadent.
Caramel Drizzle Finish
After the pretzels have set, drizzle a thin stream of homemade caramel over the top. The caramel adds a silky ribbon that contrasts with the crunchy toffee and salty snap.
Vegan Version
Use a high‑quality dairy‑free dark chocolate, replace butter with coconut oil, and choose a plant‑based cream. The result is just as glossy and delicious, and the sea salt still shines.
Storing and Bringing It Back to Life
Fridge Storage
Place the pretzels in an airtight container and store them in the refrigerator for up to two weeks. The cool environment keeps the chocolate firm and prevents the toffee from becoming sticky. Before serving, let them sit at room temperature for 15 minutes so the flavors open up.
Freezer Friendly
These pretzels freeze beautifully. Lay them in a single layer on a parchment‑lined tray, freeze for an hour, then transfer to a freezer‑safe zip bag. They’ll stay good for three months. When you’re ready to enjoy, thaw them in the fridge for 30 minutes, then let them come to room temperature.
Best Reheating Method
If the chocolate has dulled after storage, give the pretzels a quick 10‑second blast in a 300°F oven or a few seconds in a microwave. Add a tiny splash of water to the container before microwaving; the steam revives the gloss without melting the coating.